<?xml version="1.0" encoding="utf-8"?><feed xmlns="http://www.w3.org/2005/Atom" ><generator uri="https://jekyllrb.com/" version="3.10.0">Jekyll</generator><link href="https://www.danielmartingonzalez.com/feed.xml" rel="self" type="application/atom+xml" /><link href="https://www.danielmartingonzalez.com/" rel="alternate" type="text/html" /><updated>2025-02-26T16:22:27+01:00</updated><id>https://www.danielmartingonzalez.com/feed.xml</id><title type="html">danimart1991’s Blog</title><subtitle>One blog more! Another post, another article.</subtitle><author><name>Daniel Martín González</name></author><entry xml:lang="en"><title type="html">The dawn of Home Automation: An Epic Journey through its Platforms</title><link href="https://www.danielmartingonzalez.com/en/home-automation-platforms-journey/" rel="alternate" type="text/html" title="The dawn of Home Automation: An Epic Journey through its Platforms" /><published>2024-06-01T00:00:00+02:00</published><updated>2024-06-01T00:00:00+02:00</updated><id>https://www.danielmartingonzalez.com/en/home-automation-platforms-journey</id><content type="html" xml:base="https://www.danielmartingonzalez.com/en/home-automation-platforms-journey/"><![CDATA[<p>Dive into the fascinating world of home automation as we explore the stories, features, and evolutions of major platforms like Google Home, Alexa, Home Assistant, and more. Discover how they have emerged and transformed our lives.</p>]]></content><author><name>Daniel Martín González</name></author><category term="Fundamentals" /><category term="Platforms" /><category term="Zigbee" /><category term="Wi-Fi" /><category term="Thread" /><category term="Bluetooth" /><category term="Z-Wave" /><category term="Home Assistant" /><category term="Homey" /><category term="OpenHAB" /><category term="Fundamentals" /><category term="Domoticz" /><category term="Protocols" /><category term="Google Home" /><category term="Alexa" /><category term="Apple Home" /><category term="Matter" /><category term="Platforms" /><summary type="html"><![CDATA[Dive into the fascinating world of home automation as we explore the stories, features, and evolutions of major platforms like Google Home, Alexa, Home Assistant, and more. Discover how they have emerged and transformed our lives.]]></summary></entry><entry xml:lang="es"><title type="html">El amanecer de la Domótica: Un Viaje Épico a través de sus Plataformas</title><link href="https://www.danielmartingonzalez.com/es/viaje-plataformas-domotica/" rel="alternate" type="text/html" title="El amanecer de la Domótica: Un Viaje Épico a través de sus Plataformas" /><published>2024-06-01T00:00:00+02:00</published><updated>2024-06-01T00:00:00+02:00</updated><id>https://www.danielmartingonzalez.com/es/viaje-plataformas-domotica</id><content type="html" xml:base="https://www.danielmartingonzalez.com/es/viaje-plataformas-domotica/"><![CDATA[<p>Sumérgete en el fascinante mundo de la domótica mientras exploramos las historias, características y evoluciones de las principales plataformas como Google Home, Alexa, Home Assistant y más. Descubre cómo han surgido y transformado nuestras vidas.</p>]]></content><author><name>Daniel Martín González</name></author><category term="Fundamentos" /><category term="Plataformas" /><category term="Zigbee" /><category term="Wi-Fi" /><category term="Thread" /><category term="Bluetooth" /><category term="Z-Wave" /><category term="Home Assistant" /><category term="Homey" /><category term="OpenHAB" /><category term="Fundamentos" /><category term="Domoticz" /><category term="Protocolos" /><category term="Google Home" /><category term="Alexa" /><category term="Apple Home" /><category term="Matter" /><category term="Plataformas" /><summary type="html"><![CDATA[Sumérgete en el fascinante mundo de la domótica mientras exploramos las historias, características y evoluciones de las principales plataformas como Google Home, Alexa, Home Assistant y más. Descubre cómo han surgido y transformado nuestras vidas.]]></summary></entry><entry xml:lang="en"><title type="html">Discover Home Automation: Zigbee, Thread, WiFi and More</title><link href="https://www.danielmartingonzalez.com/en/introduction-physical-network-protocols/" rel="alternate" type="text/html" title="Discover Home Automation: Zigbee, Thread, WiFi and More" /><published>2024-05-17T00:00:00+02:00</published><updated>2024-05-17T00:00:00+02:00</updated><id>https://www.danielmartingonzalez.com/en/introduction-physical-network-protocols</id><content type="html" xml:base="https://www.danielmartingonzalez.com/en/introduction-physical-network-protocols/"><![CDATA[<p>We will explore the fundamentals of network protocols used in home automation and the crucial role Hubs play in creating and managing these networks.</p>]]></content><author><name>Daniel Martín González</name></author><category term="Fundamentals" /><category term="Networks" /><category term="Zigbee" /><category term="Wi-Fi" /><category term="Thread" /><category term="Bluetooth" /><category term="Z-Wave" /><category term="Ethernet" /><category term="Radiofrequency" /><category term="Infrared" /><category term="Fundamentals" /><category term="Networks" /><category term="Protocols" /><summary type="html"><![CDATA[We will explore the fundamentals of network protocols used in home automation and the crucial role Hubs play in creating and managing these networks.]]></summary></entry><entry xml:lang="es"><title type="html">Descubre la Domótica: Zigbee, Thread, WiFi y Más</title><link href="https://www.danielmartingonzalez.com/es/introduccion-protocolos-fisico-red/" rel="alternate" type="text/html" title="Descubre la Domótica: Zigbee, Thread, WiFi y Más" /><published>2024-05-17T00:00:00+02:00</published><updated>2024-05-17T00:00:00+02:00</updated><id>https://www.danielmartingonzalez.com/es/introduccion-protocolos-fisico-red</id><content type="html" xml:base="https://www.danielmartingonzalez.com/es/introduccion-protocolos-fisico-red/"><![CDATA[<p>Exploraremos los fundamentos de los protocolos de red utilizados en la domótica y el papel crucial que juegan los Hubs en la creación y gestión de estas redes.</p>]]></content><author><name>Daniel Martín González</name></author><category term="Fundamentos" /><category term="Redes" /><category term="Zigbee" /><category term="Wi-Fi" /><category term="Thread" /><category term="Bluetooth" /><category term="Z-Wave" /><category term="Ethernet" /><category term="Radiofrecuencia" /><category term="Infrarrojo" /><category term="Fundamentos" /><category term="Redes" /><category term="Protocolos" /><summary type="html"><![CDATA[Exploraremos los fundamentos de los protocolos de red utilizados en la domótica y el papel crucial que juegan los Hubs en la creación y gestión de estas redes.]]></summary></entry><entry xml:lang="en"><title type="html">Integrating a UPS in our server</title><link href="https://www.danielmartingonzalez.com/en/integrating-ups-server/" rel="alternate" type="text/html" title="Integrating a UPS in our server" /><published>2022-08-18T00:00:00+02:00</published><updated>2022-08-18T00:00:00+02:00</updated><id>https://www.danielmartingonzalez.com/en/integrating-ups-server</id><content type="html" xml:base="https://www.danielmartingonzalez.com/en/integrating-ups-server/"><![CDATA[<p>Our server is still an electronic device, and although <a href="https://www.danielmartingonzalez.com/en/backups-towards-docker/">we have protected your information by software through backup copies</a>, it is appropriate to also protect the hardware. We do not want the data to be corrupted or any electronic component damaged and we have to replace it due to a power surge or a simple power outage.</p>

<p><strong>UPS (Uninterruptible Power Supplies)</strong> arise from this need. In a very brief way, they are batteries that, placed between our electronic devices and the current, not only protect the devices from possible problems in the electrical supply, but also, in the event of a power outage, offer energy for a reasonable time so that we can safeguard the data, shut down the device correctly and avoid problems.</p>

<p>Although, the objective of this article is not to describe what a UPS is, what types exist, what you have to look for when you buy one… but the integration of it in our server to be able to monitor the information it offers and to be able to carry out different functions when we are interested in an automated way. I do recommend analyzing that the UPS we buy can be integrated via USB, since not all of them are.</p>

<p>Although compatible with many brands and models (which we will see later), for this tutorial we are going to integrate the <a href="https://amzn.to/3JYuON6"><strong>Salicru SPS 900 ONE</strong></a> model using <a href="https://networkupstools.org/"><strong><em>NUT</em> (<em>Network UPS Tools</em>)</strong></a>.</p>

<h2 id="nut-server">NUT Server</h2>

<p><a href="https://networkupstools.org/"><em>NUT</em> (<em>Network UPS Tools</em>)</a> consists of two well-differentiated parts, a <strong>software in server mode</strong>, which obtains the data from the UPS, and a <strong>software in client mode</strong>, which displays the data obtained by requesting that information from the server.</p>

<p>We need to know which USB device our server has assigned to the UPS. To do this, in the terminal of the server that is going to manage the UPS, execute <code class="language-plaintext highlighter-rouge">lsusb</code>, connect the USB cable from the UPS to the server and launch the command again. We will see a new entry:</p>

<div class="language-bash highlighter-rouge"><div class="highlight"><pre class="highlight"><code>...
Bus 002 Device 001: ID 0665:5161 Cypress Semiconductor USB to Serial
...
</code></pre></div></div>

<p>Take note of <em>Bus</em> (<code class="language-plaintext highlighter-rouge">002</code>) and <em>Device</em> (<code class="language-plaintext highlighter-rouge">001</code>). With this information we will get the path of the device. Following the example, it would be: <code class="language-plaintext highlighter-rouge">/dev/bus/usb/002/001</code>.</p>

<p>Next, and as usual in the blog, <a href="https://www.danielmartingonzalez.com/en/docker-and-portainer-in-debian/">we are going to instantiate a <em>Docker</em> container</a> in order to create a service with the purpose we are looking for. In this case, create a <em>Network UPS Tools</em> server.</p>

<p>Execute the following command in a terminal:</p>

<div class="language-bash highlighter-rouge"><div class="highlight"><pre class="highlight"><code>docker run <span class="nt">-d</span> <span class="nt">--name</span><span class="o">=</span>nut-upsd <span class="nt">--hostname</span><span class="o">=</span>nut-upsd <span class="nt">--restart</span><span class="o">=</span>always <span class="nt">--network</span><span class="o">=</span>host <span class="nt">--device</span> /dev/bus/usb/002/001 <span class="nt">-e</span> <span class="nv">UPS_NAME</span><span class="o">=</span><span class="s2">"server_ups"</span> <span class="nt">-e</span> <span class="nv">UPS_DESC</span><span class="o">=</span><span class="s2">"Server - Salicru SPS 900 ONE"</span> <span class="nt">-e</span> <span class="nv">UPS_DRIVER</span><span class="o">=</span><span class="s2">"blazer_usb"</span> <span class="nt">-e</span> <span class="nv">UPS_PORT</span><span class="o">=</span><span class="s2">"auto"</span> <span class="nt">-e</span> <span class="nv">API_USER</span><span class="o">=</span><span class="s2">"upsmon"</span> <span class="nt">-e</span> <span class="nv">API_PASSWORD</span><span class="o">=</span><span class="s2">"123456789ABCDEFGH"</span> <span class="nt">-e</span> <span class="nv">ADMIN_PASSWORD</span><span class="o">=</span><span class="s2">"123456789ABCDEFGH"</span> <span class="nt">-e</span> <span class="nv">SHUTDOWN_CMD</span><span class="o">=</span><span class="s2">"echo 'Home has no current. Proceeding to shut down...'"</span> upshift/nut-upsd
</code></pre></div></div>

<p>We are going to explain each of the parameters that have been used:</p>

<ul>
  <li><code class="language-plaintext highlighter-rouge">docker run -d</code>: Create a container with the following configuration if it doesn’t exist and start it in the background.</li>
  <li><code class="language-plaintext highlighter-rouge">--name=nut-upsd</code>: The name of the container. It is important because we can have several containers instantiated from the same image.</li>
  <li><code class="language-plaintext highlighter-rouge">--hostname=nut-upsd</code>: Is the name of the host to use inside the container.</li>
  <li><code class="language-plaintext highlighter-rouge">--restart=always</code>: Restart the container automatically if it stops. If it is stopped manually, it is only started when the container is manually started or the <em>Docker</em> service is restarted.</li>
  <li><code class="language-plaintext highlighter-rouge">--network=host</code>: The host network uses the <em>IP</em> address of the server, so a container’s network appears to be the server itself rather than separate.</li>
  <li><code class="language-plaintext highlighter-rouge">--device /dev/bus/usb/002/001</code>: We give the container access to the <em>USB</em> device that we discovered earlier.</li>
  <li><code class="language-plaintext highlighter-rouge">-e UPS_NAME="server_ups -e UPS_DESC="Server - Salicru SPS 900</code>: It is the name and description that we want to give to the UPS, in case we have more than one.</li>
  <li><code class="language-plaintext highlighter-rouge">-e UPS_DRIVER="blazer_usb"</code>: The <em>driver</em> that we are going to use with the UPS. Each brand usually has a different <em>driver</em>. Read more below.</li>
  <li><code class="language-plaintext highlighter-rouge">-e UPS_PORT="auto"</code>: Indicates the UPS port if by chance you need a specific port. It is not usually necessary to modify this parameter.</li>
  <li><code class="language-plaintext highlighter-rouge">-e API_USER="upsmon" -e API_PASSWORD="123456789ABCDEFGH"</code>: Indicates the username and password that we want to use for data read-only mode. It is the user that we will use normally.</li>
  <li><code class="language-plaintext highlighter-rouge">-e ADMIN_PASSWORD="123456789ABCDEFGH"</code>: Indicates the password used in administrator mode to perform write functions on the server and the UPS.</li>
  <li><code class="language-plaintext highlighter-rouge">-e SHUTDOWN_CMD="echo 'Home has no current. Proceeding to shut down...'"</code>: <em>script</em>/command to run when battery is VERY low. For example, perform a server shutdown.</li>
  <li><code class="language-plaintext highlighter-rouge">upshift/nut-upsd</code>: Indicates the image used to mount the container. If no version is indicated, it will take the latest stable version.</li>
</ul>

<p>To know which <code class="language-plaintext highlighter-rouge">UPS_DRIVER</code> to use, you can consult <a href="https://networkupstools.org/stable-hcl.html">the <em>NUT</em> compatibility list</a>, in case you can’t find it, there is a <a href="https://networkupstools.org/ddl/">list of devices tested by the community</a>.</p>

<blockquote>
  <p>You also have an example for <em>Docker Compose</em> <a href="https://github.com/danimart1991/docker-compose-files/tree/master/nut-upsd">here</a>.</p>
</blockquote>

<h2 id="clients">Clients</h2>

<p>Once the server is instantiated, we can use any client to query data or perform different functions.</p>

<p>The server container itself includes a client. If we have enough knowledge of <em>Docker</em>, we can do a *Docker Attach *and execute <code class="language-plaintext highlighter-rouge">upsd &lt;UPS_NAME&gt;</code> (<code class="language-plaintext highlighter-rouge">UPS_NAME</code> is the name of the UPS that we have indicated when instantiating the server). Commands can also be run with <a href="https://networkupstools.org/docs/man/upscmd.html">upscmd</a> and <a href="https://networkupstools.org/docs/man/upsrw.html">upsrw</a>.</p>

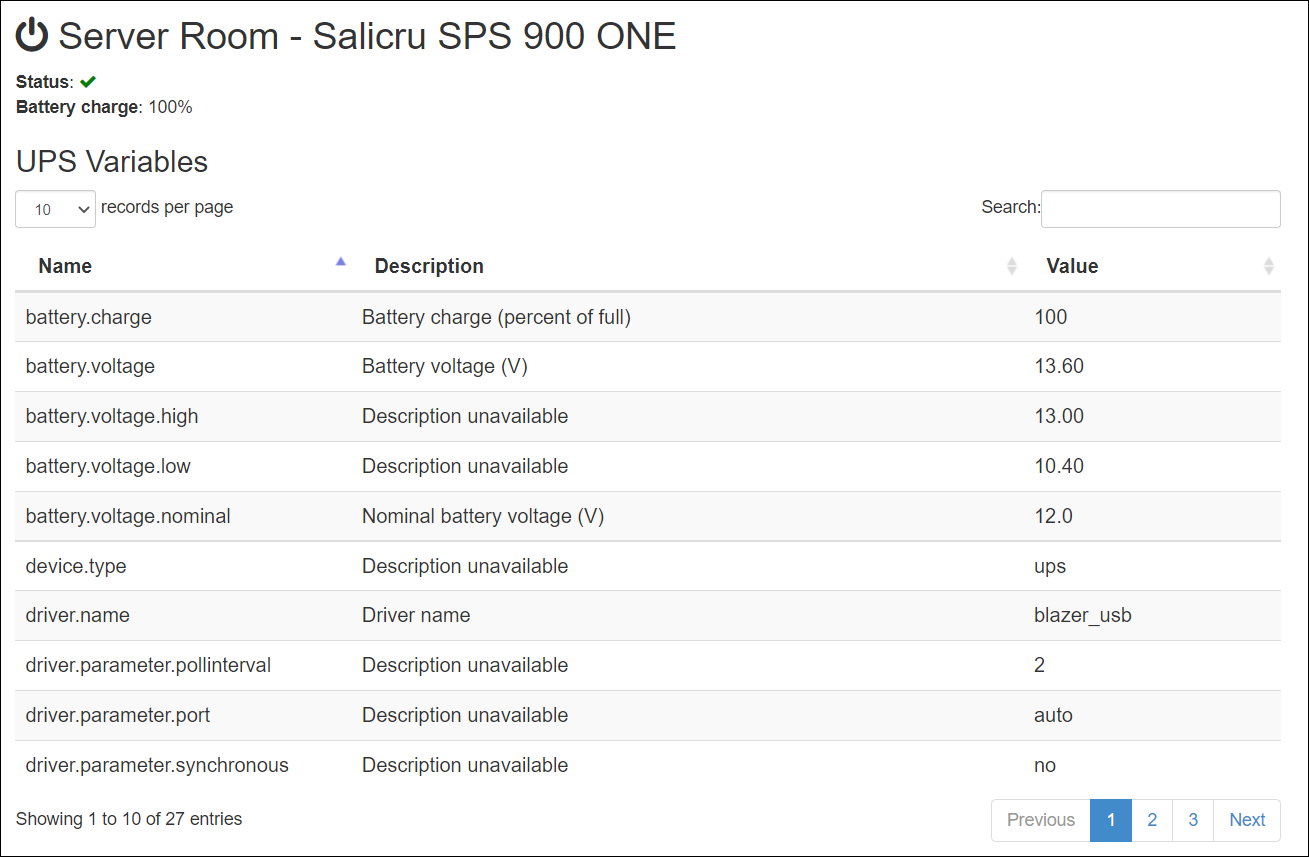
<h3 id="docker-webnut">docker-webnut</h3>

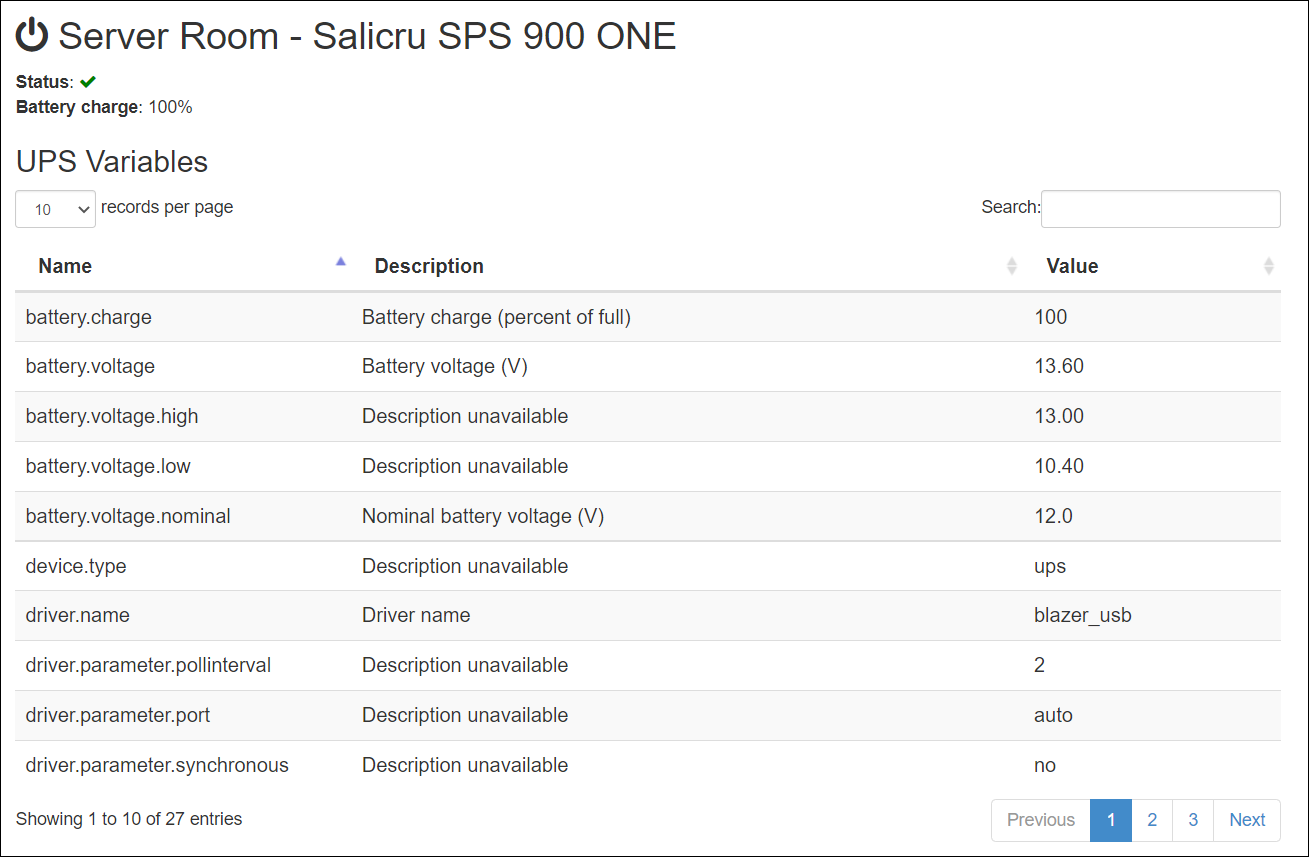
<p><a href="/assets/posts/en/integrating-ups-server/docker-webnut.png"><img src="/assets/posts/en/integrating-ups-server/docker-webnut.png" alt="docker-webnut client preview" /></a></p>

<p><a href="https://github.com/edgd1er/docker-webnut"><strong><em>docker-webnut</em></strong></a> is another simple client for querying data. We can instantiate a <em>Docker</em> container with the following command:</p>

<div class="language-bash highlighter-rouge"><div class="highlight"><pre class="highlight"><code>docker run <span class="nt">-d</span> <span class="nt">--name</span><span class="o">=</span>webnut <span class="nt">--hostname</span><span class="o">=</span>webnut <span class="nt">--restart</span><span class="o">=</span>always <span class="nt">--network</span><span class="o">=</span>host <span class="nt">-e</span> <span class="nv">UPS_HOST</span><span class="o">=</span><span class="s2">"&lt;IP_SERVIDOR&gt;"</span> <span class="nt">-e</span> <span class="nv">UPS_PORT</span><span class="o">=</span><span class="s2">"3493"</span> <span class="nt">-e</span> <span class="nv">UPS_USER</span><span class="o">=</span><span class="s2">"upsmon"</span> <span class="nt">-e</span> <span class="nv">UPS_PASSWORD</span><span class="o">=</span><span class="s2">"123456789ABCDEFGH"</span> edgd1er/webnut:latest
</code></pre></div></div>

<p>We only need to indicate the <em>IP</em> of the machine to which the UPS is connected via <em>USB</em> (in our example, the <em>IP</em> of the server), the username and password that we indicated when instantiating the <em>NUT</em> server, and the port, which is <code class="language-plaintext highlighter-rouge">3493</code> by default.</p>

<p>Next, we access a Web browser and indicate the address <code class="language-plaintext highlighter-rouge">http://&lt;Server_IP&gt;:3494</code>.</p>

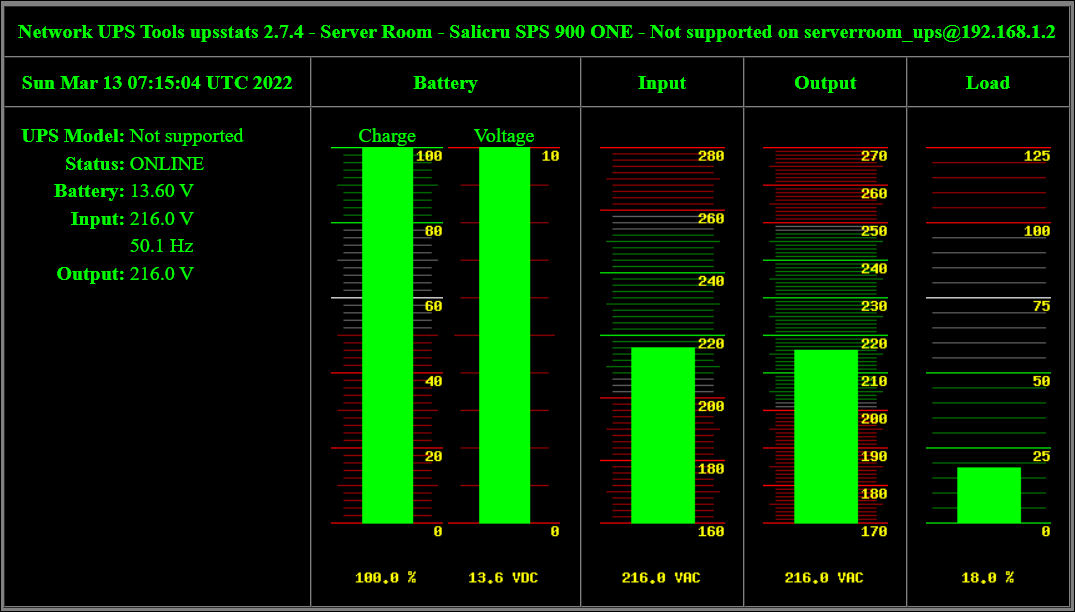
<h3 id="nut-webui">nut-webui</h3>

<p><a href="/assets/posts/en/integrating-ups-server/nut-webui-dashboard-01.png"><img src="/assets/posts/en/integrating-ups-server/nut-webui-dashboard-01.png" alt="nut-webui client preview" /></a></p>

<p><a href="/assets/posts/en/integrating-ups-server/nut-webui-dashboard-02.png"><img src="/assets/posts/en/integrating-ups-server/nut-webui-dashboard-02.png" alt="nut-webui client preview detail" /></a></p>

<p>The <a href="https://github.com/gpdm/nut"><strong><em>nut-webui</em></strong></a> client is somewhat more complex. We need to previously create the files:</p>

<ul>
  <li><code class="language-plaintext highlighter-rouge">upsset.conf</code>
    <ul>
      <li>Uncomment the line to have <code class="language-plaintext highlighter-rouge">http://&lt;Server_IP&gt;:6544/cgi-bin/nut/upsset.cgi</code></li>
      <li>User <em>admin</em>, password, the one generated automatically in the <em>Docker Log</em> or indicated in the creation of the <em>NUT</em> server.</li>
    </ul>
  </li>
  <li><code class="language-plaintext highlighter-rouge">hosts.conf</code>
    <ul>
      <li>Enter the UPS data.</li>
    </ul>
  </li>
  <li><code class="language-plaintext highlighter-rouge">upsstats.html</code></li>
  <li><code class="language-plaintext highlighter-rouge">upsstats-single.html</code></li>
</ul>

<blockquote>
  <p>Configuration and sample files: <a href="https://github.com/gpdm/nut/tree/master/nut-webui/files/etc/nut">https://github.com/gpdm/nut/tree/master/nut-webui/files/etc/nut</a></p>
</blockquote>

<p>And include them in a folder that we will use when instantiating the container with the following command:</p>

<div class="language-bash highlighter-rouge"><div class="highlight"><pre class="highlight"><code>docker run <span class="nt">-d</span> <span class="nt">--name</span><span class="o">=</span>nut-webui <span class="nt">--hostname</span><span class="o">=</span>nut-webui <span class="nt">--restart</span><span class="o">=</span>always <span class="nt">-p</span> 6495:80 <span class="nt">-v</span> &lt;PATH_FOLDER_CONFIGURATION_FILES&gt;:/etc/nut gpdm/nut-webui:latest
</code></pre></div></div>

<p>Next, we access a <em>Web</em> browser and indicate the address <code class="language-plaintext highlighter-rouge">http://&lt;Server_IP&gt;:3495</code>.</p>

<h2 id="bonus-homeassistant-integration">Bonus: HomeAssistant integration</h2>

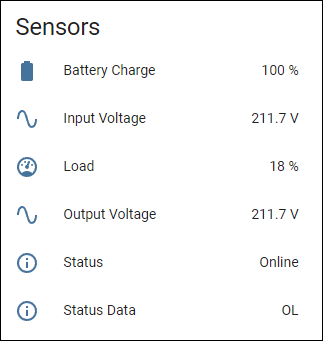
<p>We can use <a href="https://www.home-assistant.io/"><strong><em>Home Assistant</em></strong></a> as a client, monitor the values offered by the server and perform different automations depending on the status of the sensors created with these values.</p>

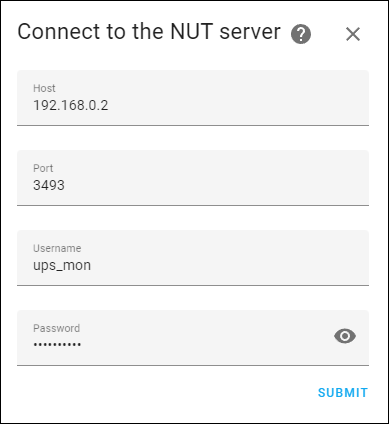
<p>Surely, the automatic detection system of <em>Home Assistant</em> detects <em>NUT</em> in our network, but if it is not the case, it is enough to add the integration from <code class="language-plaintext highlighter-rouge">Settings -&gt; Devices &amp; Services -&gt; Add Integration -&gt; Network UPS Tools (NUT)</code>.</p>

<p><a href="/assets/posts/en/integrating-ups-server/nut-homeassistant-config.png"><img src="/assets/posts/en/integrating-ups-server/nut-homeassistant-config.png" alt="NUT Configuration in Home Assistant" /></a></p>

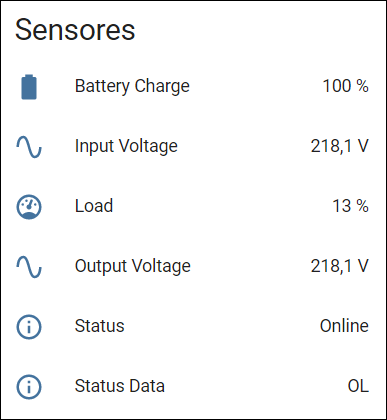
<p>We indicate the data of our <em>NUT</em> server as we have done in other clients and that’s it.</p>

<p><a href="/assets/posts/en/integrating-ups-server/nut-homeassistant-sensors.png"><img src="/assets/posts/en/integrating-ups-server/nut-homeassistant-sensors.png" alt="Home Assistant NUT UPS Sensors" /></a></p>

<h2 id="bonus-2-checkmk-integration">Bonus 2: CheckMK integration</h2>

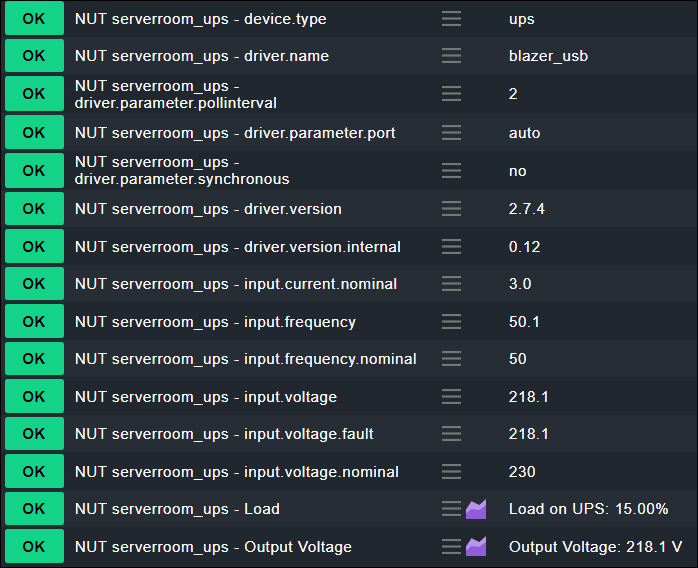
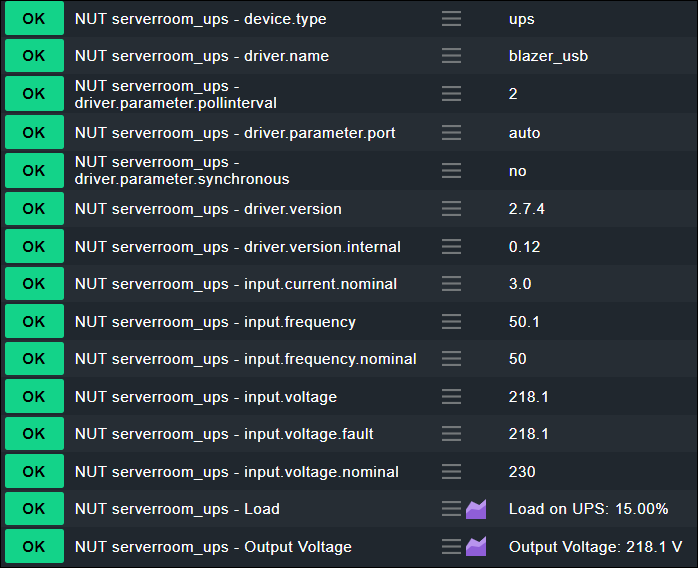
<p>Although we have not talked about <a href="https://checkmk.com/"><strong><em>CheckMK</em></strong></a> in this blog, it is a monitoring and alert system that I use frequently. If you are familiar with it, you may be interested in the following <em>Plugin</em> to monitor <em>UPS</em> data: https://github.com/danimart1991/checkmk_nut</p>

<p><a href="/assets/posts/en/integrating-ups-server/nut-checkmk-sensors.png"><img src="/assets/posts/en/integrating-ups-server/nut-checkmk-sensors.png" alt="CheckMK NUT UPS Sensors" /></a></p>

<h2 id="references">References</h2>

<ul>
  <li><a href="https://blog.shadypixel.com/monitoring-a-ups-with-nut-on-debian-or-ubuntu-linux/">Random Bits - Monitoring a UPS with nut on Debian or Ubuntu Linux</a></li>
  <li><a href="https://domology.es/integrar-un-sai-en-home-assistant/">Domology - Integrar un SAI en Home Assistant</a></li>
  <li><a href="https://networkupstools.org/documentation.html">Network UPS Tools - Documentation</a></li>
  <li><a href="https://blog.minodudd.com/2013/10/23/ups-monitoring-with-nut-nagios-and-check_mk/">Tinkerings - UPS monitoring with NUT, Nagios and Check_MK</a></li>
  <li><a href="https://www.profesionalreview.com/2019/02/23/que-es-sai/">Professional Review - SAI: Qué es, para qué sirve y que tipos hay en el mercado</a></li>
</ul>]]></content><author><name>Daniel Martín González</name></author><category term="Tutorial" /><category term="Homelab" /><category term="Server" /><category term="Homelab" /><category term="Server" /><category term="Tutorial" /><category term="Sai" /><category term="Ups" /><category term="Usb" /><summary type="html"><![CDATA[Our server is still an electronic device, and although we have protected your information by software through backup copies, it is appropriate to also protect the hardware. We do not want the data to be corrupted or any electronic component damaged and we have to replace it due to a power surge or a simple power outage.]]></summary></entry><entry xml:lang="es"><title type="html">Integrando un SAI en nuestro servidor</title><link href="https://www.danielmartingonzalez.com/es/integrando-sai-servidor/" rel="alternate" type="text/html" title="Integrando un SAI en nuestro servidor" /><published>2022-08-18T00:00:00+02:00</published><updated>2022-08-18T00:00:00+02:00</updated><id>https://www.danielmartingonzalez.com/es/integrando-sai-servidor</id><content type="html" xml:base="https://www.danielmartingonzalez.com/es/integrando-sai-servidor/"><![CDATA[<p>Nuestro servidor, no deja de ser un equipo electrónico, y si bien, <a href="https://www.danielmartingonzalez.com/es/copias-de-seguridad-para-con-docker/">hemos protegido su información por <em>software</em> mediante copias de seguridad</a>, lo apropiado es proteger también el <em>hardware</em>. No queremos que, por una subida de tensión, o por un simple corte de luz, los datos queden corruptos o cualquier componente electrónico quede dañado y tengamos que sustituirlo.</p>

<p><strong>Los SAI (Sistemas de Alimentación Ininterrumpida)</strong> surgen ante esta necesidad. De manera muy resumida, son baterías que, colocadas entre nuestros dispositivos electrónicos y la corriente, no solo protege a los dispositivos de posibles problemas en el suministro eléctrico, si no que también, ante un corte, ofrecen energía un tiempo prudencial para que podamos salvaguardar los datos, apagar el dispositivo correctamente y evitar problemas.</p>

<p>Si bien, el objetivo de este artículo no es el de describir que es un SAI, que tipos existen, que has de buscar cuando compres uno… si no la integración de éste en nuestro servidor para poder monitorizar la información que ofrece y poder llevar a cabo distintas funciones cuando nos interese de manera automatizada. Si recomiendo, analizar que el SAI que compremos sea integrable por <em>USB</em>, ya que no todos lo son.</p>

<p>Aunque compatible con muchas marcas y modelos (que veremos más adelante), para este tutorial vamos a integrar el modelo <a href="https://amzn.to/3JYuON6"><strong>Salicru SPS 900 ONE</strong></a> haciendo uso de <a href="https://networkupstools.org/"><strong><em>NUT</em> (<em>Network UPS Tools</em>)</strong></a>.</p>

<h2 id="servidor-nut">Servidor NUT</h2>

<p><a href="https://networkupstools.org/"><em>NUT</em> (<em>Network UPS Tools</em>)</a> consta de dos partes bien diferenciadas, <strong>un software en modo servidor</strong>, el cual obtiene los datos del SAI, y <strong>un software en modo cliente</strong>, que muestra los datos obtenidos pidiendo al servidor esa información.</p>

<p>Necesitamos conocer que dispositivo <em>USB</em> ha asignado nuestro servidor al SAI. Para ello, en la terminal del servidor que va a gestionar el SAI ejecutamos <code class="language-plaintext highlighter-rouge">lsusb</code>, enchufamos un cable <em>USB</em> del <em>SAI</em> al servidor y lanzamos el comando de nuevo. Veremos una nueva entrada:</p>

<div class="language-bash highlighter-rouge"><div class="highlight"><pre class="highlight"><code>...
Bus 002 Device 001: ID 0665:5161 Cypress Semiconductor USB to Serial
...
</code></pre></div></div>

<p>Apuntamos <em>Bus</em> (<code class="language-plaintext highlighter-rouge">002</code>) y <em>Device</em> (<code class="language-plaintext highlighter-rouge">001</code>). Con esta información sacaremos la ruta del <code class="language-plaintext highlighter-rouge">device</code>. Siguiendo el ejemplo, quedaría: <code class="language-plaintext highlighter-rouge">/dev/bus/usb/002/001</code>.</p>

<p>A continuación, y como viene siendo habitual en el blog, <a href="https://www.danielmartingonzalez.com/es/docker-y-portainer-en-debian/">vamos a instanciar un contenedor <em>Docker</em></a> con el fin de crear un servicio con el propósito que buscamos. En este caso, crear un servidor <em>Network UPS Tools</em>.</p>

<p>Ejecutamos el siguiente comando en un terminal:</p>

<div class="language-bash highlighter-rouge"><div class="highlight"><pre class="highlight"><code>docker run <span class="nt">-d</span> <span class="nt">--name</span><span class="o">=</span>nut-upsd <span class="nt">--hostname</span><span class="o">=</span>nut-upsd <span class="nt">--restart</span><span class="o">=</span>always <span class="nt">--network</span><span class="o">=</span>host <span class="nt">--device</span> /dev/bus/usb/002/001 <span class="nt">-e</span> <span class="nv">UPS_NAME</span><span class="o">=</span><span class="s2">"server_ups"</span> <span class="nt">-e</span> <span class="nv">UPS_DESC</span><span class="o">=</span><span class="s2">"Server - Salicru SPS 900 ONE"</span> <span class="nt">-e</span> <span class="nv">UPS_DRIVER</span><span class="o">=</span><span class="s2">"blazer_usb"</span> <span class="nt">-e</span> <span class="nv">UPS_PORT</span><span class="o">=</span><span class="s2">"auto"</span> <span class="nt">-e</span> <span class="nv">API_USER</span><span class="o">=</span><span class="s2">"upsmon"</span> <span class="nt">-e</span> <span class="nv">API_PASSWORD</span><span class="o">=</span><span class="s2">"123456789ABCDEFGH"</span> <span class="nt">-e</span> <span class="nv">ADMIN_PASSWORD</span><span class="o">=</span><span class="s2">"123456789ABCDEFGH"</span> <span class="nt">-e</span> <span class="nv">SHUTDOWN_CMD</span><span class="o">=</span><span class="s2">"echo 'Home has no current. Proceeding to shut down...'"</span> upshift/nut-upsd
</code></pre></div></div>

<p>Vamos a explicar cada uno de los parámetros que se han usado:</p>

<ul>
  <li><code class="language-plaintext highlighter-rouge">docker run -d</code>: Crea un contenedor con la siguiente configuración si no existe y lo arranca en segundo plano.</li>
  <li><code class="language-plaintext highlighter-rouge">--name=nut-upsd</code>: El nombre del contenedor. Es importante pues podemos tener varios contenedores instanciados desde la misma imagen.</li>
  <li><code class="language-plaintext highlighter-rouge">--hostname=nut-upsd</code>: Es el nombre del host que se va a usar dentro del contenedor.</li>
  <li><code class="language-plaintext highlighter-rouge">--restart=always</code>: Reinicia el contenedor automáticamente si se para. Si se para manualmente, solo es inciiado cuando el contenedor se inicie manualmente o el servicio <em>Docker</em> sea reiniciado.</li>
  <li><code class="language-plaintext highlighter-rouge">--network=host</code>: La red host utiliza la dirección <em>IP</em> del servidor, de modo que la red de un contenedor parece ser el propio servidor en lugar de estar separado.</li>
  <li><code class="language-plaintext highlighter-rouge">--device /dev/bus/usb/002/001</code>: Damos acceso al contenedor al dispositivo <em>USB</em> que hemos descubierto antes.</li>
  <li><code class="language-plaintext highlighter-rouge">-e UPS_NAME="server_ups -e UPS_DESC="Server - Salicru SPS 900</code>: Es el nombre y descripción que queremos dar al SAI, por si tenemos más de uno.</li>
  <li><code class="language-plaintext highlighter-rouge">-e UPS_DRIVER="blazer_usb"</code>: El <em>driver</em> que vamos a usar con el SAI. Cada marca suele tener un <em>driver</em> diferente. Lee más abajo.</li>
  <li><code class="language-plaintext highlighter-rouge">-e UPS_PORT="auto"</code>: Indica el puerto del SAI si por un casual necesita un puerto específico. No suele ser necesario modificar este parámetro.</li>
  <li><code class="language-plaintext highlighter-rouge">-e API_USER="upsmon" -e API_PASSWORD="123456789ABCDEFGH"</code>: Indica el usuario y contraseña que queremos usar para el modo de solo lectura de datos. Es el usuario que usaremos normalmente.</li>
  <li><code class="language-plaintext highlighter-rouge">-e ADMIN_PASSWORD="123456789ABCDEFGH"</code>: Indica la contraseña usada en el modo administrador para realizar funciones de escritura en el servidor y en el SAI.</li>
  <li><code class="language-plaintext highlighter-rouge">-e SHUTDOWN_CMD="echo 'Home has no current. Proceeding to shut down...'"</code>: <em>script</em>/comando a ejecutar cuando la batería sea MUY baja. Por ejemplo, realizar un apagado del servidor.</li>
  <li><code class="language-plaintext highlighter-rouge">upshift/nut-upsd</code>: Indica la imagen usada para montar el contenedor. Si no se indica versión cogerá la última versión estable.</li>
</ul>

<p>Para saber que <code class="language-plaintext highlighter-rouge">UPS_DRIVER</code> usar, se puede consultar <a href="https://networkupstools.org/stable-hcl.html">la lista de compatibilidad de <em>NUT</em></a>, en el caso de no encontrarlo, hay una lista de <a href="https://networkupstools.org/ddl/">dispositivos probados por la comunidad</a>.</p>

<blockquote>
  <p>También dispones de un ejemplo para <em>Docker Compose</em> <a href="https://github.com/danimart1991/docker-compose-files/tree/master/nut-upsd">aquí</a>.</p>
</blockquote>

<h2 id="clientes">Clientes</h2>

<p>Una vez instanciado el servidor, podremos usar cualquier cliente para consultar datos o realizar diferentes funciones.</p>

<p>El propio contenedor del servidor incluye un cliente. Si tenemos conocimientos suficientes de <em>Docker</em>, podemos realizar un <em>Docker Attach</em> y ejecutar <code class="language-plaintext highlighter-rouge">upsd &lt;UPS_NAME&gt;</code> (<code class="language-plaintext highlighter-rouge">UPS_NAME</code> es el nombre del SAI que hemos indicado al instanciar el servidor). También se pueden ejecutar comandos con <a href="https://networkupstools.org/docs/man/upscmd.html">upscmd</a> y <a href="https://networkupstools.org/docs/man/upsrw.html">upsrw</a>.</p>

<h3 id="docker-webnut">docker-webnut</h3>

<p><a href="/assets/posts/es/integrando-sai-servidor/docker-webnut.png"><img src="/assets/posts/es/integrando-sai-servidor/docker-webnut.png" alt="Vista previa cliente docker-webnut" /></a></p>

<p><a href="https://github.com/edgd1er/docker-webnut"><strong><em>docker-webnut</em></strong></a> es otro cliente sencillo para consultar datos. Podemos instanciar un contenedor <em>Docker</em> con el siguiente comando:</p>

<div class="language-bash highlighter-rouge"><div class="highlight"><pre class="highlight"><code>docker run <span class="nt">-d</span> <span class="nt">--name</span><span class="o">=</span>webnut <span class="nt">--hostname</span><span class="o">=</span>webnut <span class="nt">--restart</span><span class="o">=</span>always <span class="nt">--network</span><span class="o">=</span>host <span class="nt">-e</span> <span class="nv">UPS_HOST</span><span class="o">=</span><span class="s2">"&lt;IP_SERVIDOR&gt;"</span> <span class="nt">-e</span> <span class="nv">UPS_PORT</span><span class="o">=</span><span class="s2">"3493"</span> <span class="nt">-e</span> <span class="nv">UPS_USER</span><span class="o">=</span><span class="s2">"upsmon"</span> <span class="nt">-e</span> <span class="nv">UPS_PASSWORD</span><span class="o">=</span><span class="s2">"123456789ABCDEFGH"</span> edgd1er/webnut:latest
</code></pre></div></div>

<p>Solo necesitamos indicar la <em>IP</em> de la máquina a la que está conectado por <em>USB</em> el SAI (en nuestro ejemplo, la <em>IP</em> del servidor), el usuario y contraseña que hemos indicado al instanciar el servidor <em>NUT</em> y el puerto, que por defecto es <code class="language-plaintext highlighter-rouge">3493</code>.</p>

<p>A continuación, accedemos a un navegador <em>Web</em> e indicamos la dirección <code class="language-plaintext highlighter-rouge">http://&lt;IP_Servidor&gt;:3494</code>.</p>

<h3 id="nut-webui">nut-webui</h3>

<p><img src="/assets/posts/es/integrando-sai-servidor/nut-webui-dashboard-01.png" alt="Vista previa cliente nut-webui" />](/assets/posts/es/integrando-sai-servidor/nut-webui-dashboard-01.png)</p>
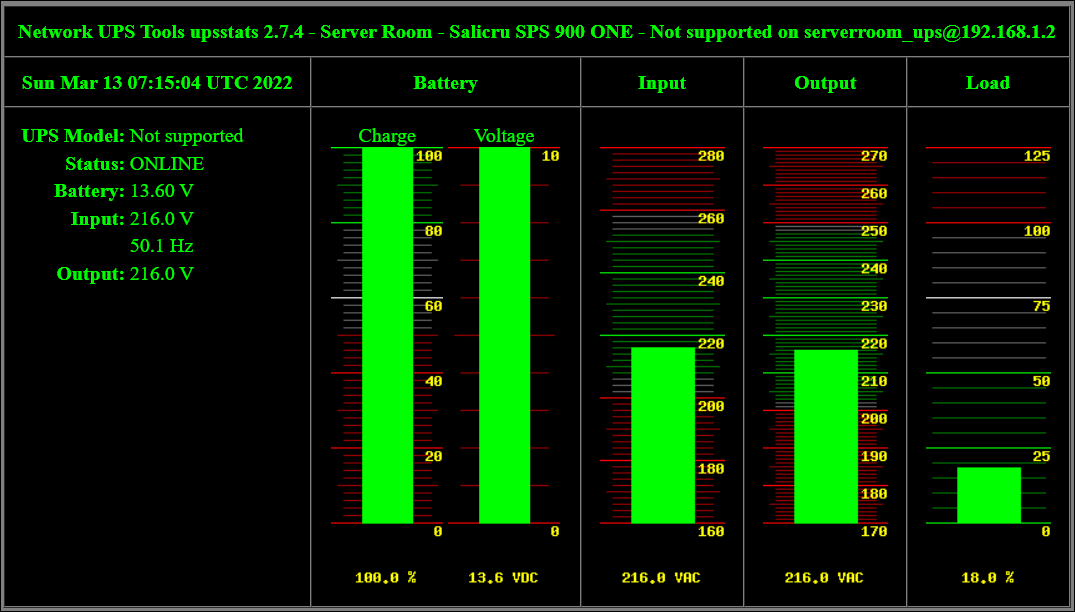
<p><img src="/assets/posts/es/integrando-sai-servidor/nut-webui-dashboard-02.png" alt="Vista previa cliente detalle nut-webui" />](/assets/posts/es/integrando-sai-servidor/nut-webui-dashboard-02.png)</p>
<p>El cliente <a href="https://github.com/gpdm/nut"><strong><em>nut-webui</em></strong></a> es algo más complejo. Necesitamos crear previamente los archivos:</p>

<ul>
  <li><code class="language-plaintext highlighter-rouge">upsset.conf</code>
    <ul>
      <li>Descomentar la línea para disponer de <code class="language-plaintext highlighter-rouge">http://&lt;IP_Servidor&gt;:6544/cgi-bin/nut/upsset.cgi</code></li>
      <li>Usuario <em>admin</em>, contraseña, la generada automáticamente en el <em>Log de Docker</em> o indicada en la creación del servidor <em>NUT</em>.</li>
    </ul>
  </li>
  <li><code class="language-plaintext highlighter-rouge">hosts.conf</code>
    <ul>
      <li>Poner dentro los datos del SAI.</li>
    </ul>
  </li>
  <li><code class="language-plaintext highlighter-rouge">upsstats.html</code></li>
  <li><code class="language-plaintext highlighter-rouge">upsstats-single.html</code></li>
</ul>

<blockquote>
  <p>Configuración y archivos de ejemplo: <a href="https://github.com/gpdm/nut/tree/master/nut-webui/files/etc/nut">https://github.com/gpdm/nut/tree/master/nut-webui/files/etc/nut</a></p>
</blockquote>

<p>E incluirlos en una carpeta que usaremos al instanciar el contenedor con el siguiente comando:</p>

<div class="language-bash highlighter-rouge"><div class="highlight"><pre class="highlight"><code>docker run <span class="nt">-d</span> <span class="nt">--name</span><span class="o">=</span>nut-webui <span class="nt">--hostname</span><span class="o">=</span>nut-webui <span class="nt">--restart</span><span class="o">=</span>always <span class="nt">-p</span> 6495:80 <span class="nt">-v</span> &lt;RUTA_CARPETA_ARCHIVOS_CONFIGURACIÓN&gt;:/etc/nut gpdm/nut-webui:latest
</code></pre></div></div>

<p>A continuación, accedemos a un navegador <em>Web</em> e indicamos la dirección <code class="language-plaintext highlighter-rouge">http://&lt;IP_Servidor&gt;:3495</code>.</p>

<h2 id="bonus-integración-en-home-assistant">Bonus: Integración en Home Assistant</h2>

<p>Podemos usar <a href="https://www.home-assistant.io/"><strong><em>Home Assistant</em></strong></a> como cliente, monitorizar los valores que ofrece el servidor y realizar diferentes automatizaciones dependiendo del estado de los sensores creados con estos valores.</p>

<p>Seguramente, el sistema de detección automático de <em>Home Assistant</em> detecte <em>NUT</em> en nuestra red, pero si no es el caso, basta con añadir la integración desde <code class="language-plaintext highlighter-rouge">Ajustes -&gt; Dispositivos y Servicios -&gt; Añadir Integración -&gt; Network UPS Tools (NUT)</code>.</p>

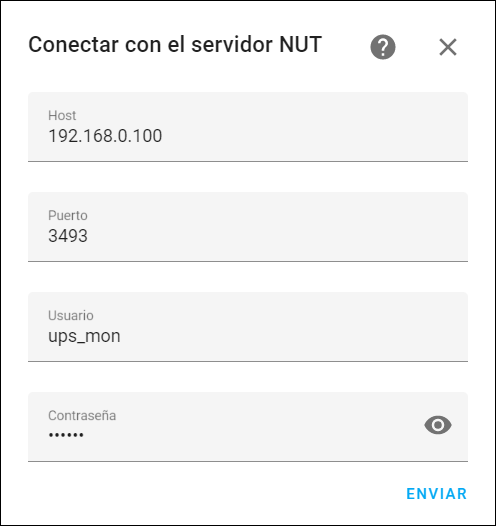
<p><a href="/assets/posts/es/integrando-sai-servidor/nut-homeassistant-configuracion.png"><img src="/assets/posts/es/integrando-sai-servidor/nut-homeassistant-configuracion.png" alt="Configuracion de NUT en Home Assistant" /></a></p>

<p>Indicamos los datos de nuestro servidor <em>NUT</em> como hemos hecho en otros clientes y listo.</p>

<p><a href="/assets/posts/es/integrando-sai-servidor/nut-homeassistant-sensores.png"><img src="/assets/posts/es/integrando-sai-servidor/nut-homeassistant-sensores.png" alt="Sensores de SAI en Home Assistant" /></a></p>

<h2 id="bonus-2-integración-en-checkmk">Bonus 2: Integración en CheckMK</h2>

<p>Aunque no hemos hablado en este blog sobre <a href="https://checkmk.com/"><strong><em>CheckMK</em></strong></a>, es un sistema de monitorización y alertas que uso con frecuencia. Si estás familiarizado con él, puede interesarte el siguiente <em>Plugin</em> para poder monitorizar los datos del SAI: https://github.com/danimart1991/checkmk_nut</p>

<p><a href="/assets/posts/es/integrando-sai-servidor/nut-checkmk-sensores.png"><img src="/assets/posts/es/integrando-sai-servidor/nut-checkmk-sensores.png" alt="Sensores de SAI en CheckMK" /></a></p>

<h2 id="referencias">Referencias</h2>

<ul>
  <li><a href="https://blog.shadypixel.com/monitoring-a-ups-with-nut-on-debian-or-ubuntu-linux/">Random Bits - Monitoring a UPS with nut on Debian or Ubuntu Linux</a></li>
  <li><a href="https://domology.es/integrar-un-sai-en-home-assistant/">Domology - Integrar un SAI en Home Assistant</a></li>
  <li><a href="https://networkupstools.org/documentation.html">Network UPS Tools - Documentation</a></li>
  <li><a href="https://blog.minodudd.com/2013/10/23/ups-monitoring-with-nut-nagios-and-check_mk/">Tinkerings - UPS monitoring with NUT, Nagios and Check_MK</a></li>
  <li><a href="https://www.profesionalreview.com/2019/02/23/que-es-sai/">Professional Review - SAI: Qué es, para qué sirve y que tipos hay en el mercado</a></li>
</ul>]]></content><author><name>Daniel Martín González</name></author><category term="Tutorial" /><category term="Homelab" /><category term="Servidor" /><category term="Homelab" /><category term="Server" /><category term="Tutorial" /><category term="Sai" /><category term="Ups" /><category term="Usb" /><category term="Servidor" /><summary type="html"><![CDATA[Nuestro servidor, no deja de ser un equipo electrónico, y si bien, hemos protegido su información por software mediante copias de seguridad, lo apropiado es proteger también el hardware. No queremos que, por una subida de tensión, o por un simple corte de luz, los datos queden corruptos o cualquier componente electrónico quede dañado y tengamos que sustituirlo.]]></summary></entry><entry xml:lang="en"><title type="html">Webmin: Managing a server from the browser</title><link href="https://www.danielmartingonzalez.com/en/webmin-managing-server-from-browser/" rel="alternate" type="text/html" title="Webmin: Managing a server from the browser" /><published>2022-04-14T00:00:00+02:00</published><updated>2022-04-14T00:00:00+02:00</updated><id>https://www.danielmartingonzalez.com/en/webmin-managing-server-from-browser</id><content type="html" xml:base="https://www.danielmartingonzalez.com/en/webmin-managing-server-from-browser/"><![CDATA[<p>I don’t know much about <em>Unix</em> systems. While I can type some commands and move around its directories, it’s not something I’m used to or like to deal with. But I recognize that a <em>Linux</em> distribution is the best option to set up a server.</p>

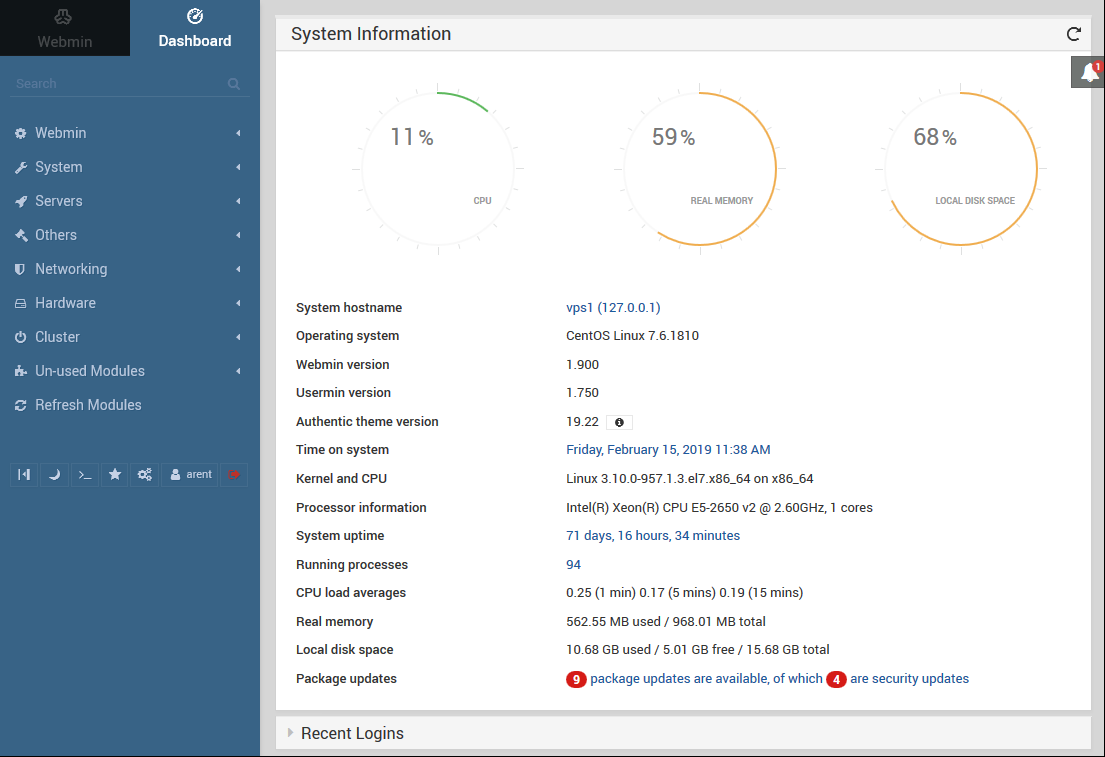
<p><a href="/assets/posts/en/webmin-managing-server-from-browser/webmin-dashboard.png"><img src="/assets/posts/en/webmin-managing-server-from-browser/webmin-dashboard.png" alt="Webmin's System information start screen (Dashboard)" /></a></p>

<p><a href="https://webmin.com/"><strong><em>Webmin</em></strong></a> solves the management of a server in an elegant way, since it is a system configuration tool accessible via the web for <em>Unix</em> systems. With it, you can configure user accounts, view and edit files, view the status of system resources, and much more from the comfort of your browser. This application helps us eliminate the need to edit the configuration and service files manually and provides an interface to do it easily and with little tips.</p>

<blockquote>
  <p><strong>WARNING</strong>: <em>Webmin</em> allows you to modify settings and data at the core level of the system, this means that before touching any module, it is advisable to read documentation about how it works and how it can affect our server.</p>
</blockquote>

<h2 id="installation-and-use">Installation and Use</h2>

<p>We are going to install <em>Webmin</em> on the system itself by <code class="language-plaintext highlighter-rouge">apt</code> package. The reason for doing it this way and not in a <em>Docker</em> container is because <em>Webmin</em> needs to have full access to the entire system, both files and services. Also, if for any reason the <em>Docker</em> service goes down, you can still use <em>Webmin</em> to fix the problem.</p>

<p>Assuming that your server has a distribution based on <em>Debian</em>, <em>Ubuntu</em> or <em>Mint</em>. Execute the following commands:</p>

<div class="language-bash highlighter-rouge"><div class="highlight"><pre class="highlight"><code><span class="nv">$ </span><span class="nb">sudo </span>wget <span class="nt">-qO</span> - http://www.webmin.com/jcameron-key.asc | <span class="nb">sudo </span>apt-key add -
<span class="nv">$ </span><span class="nb">sudo </span>sh <span class="nt">-c</span> <span class="s1">'echo "deb http://download.webmin.com/download/repository sarge contrib" &gt; /etc/apt/sources.list.d/webmin.list'</span>
<span class="nv">$ </span><span class="nb">sudo </span>apt <span class="nb">install </span>apt-transport-https <span class="nt">-y</span>
<span class="nv">$ </span><span class="nb">sudo </span>apt update
<span class="nv">$ </span><span class="nb">sudo </span>apt <span class="nb">install </span>webmin <span class="nt">-y</span>
</code></pre></div></div>

<blockquote>
  <p>For the rest of the distributions and available installation types, you can consult <a href="http://doxfer.webmin.com/Webmin/Installation">this <em>Wiki</em></a>.</p>
</blockquote>

<p>And that’s all, finally, open a browser and access the address <code class="language-plaintext highlighter-rouge">https://&lt;ip_of_your_server&gt;:10000</code>. On the main screen (<em>Dashboard</em>) you will have summary information on the status of your server. In the bar on the left you will have different utilities to manage the server. Remember, before touching, it is convenient to read the documentation of that module and tool.</p>

<blockquote>
  <p>It is possible that, when entering for the first time, a certificate error is displayed, agree to enter in a non-secure way.</p>
</blockquote>

<h2 id="references">References</h2>

<ul>
  <li><a href="https://webmin.com">Webmin - Official Web</a></li>
  <li><a href="https://doxfer.webmin.com/Webmin">Webmin - Wiki</a></li>
  <li><a href="https://raiolanetworks.es/blog/webmin-usermin-virtualmin">Raiola Networks - Manual completo Webmin, Usermin y Virtualmin</a></li>
  <li><a href="https://linuxize.com/post/how-to-install-webmin-on-debian-10/">Linuxize - How to Install Webmin on Debian 10 Linux</a></li>
</ul>]]></content><author><name>Daniel Martín González</name></author><category term="Tutorial" /><category term="Server" /><category term="Webmin" /><category term="Server" /><category term="Tutorial" /><category term="Management" /><summary type="html"><![CDATA[I don’t know much about Unix systems. While I can type some commands and move around its directories, it’s not something I’m used to or like to deal with. But I recognize that a Linux distribution is the best option to set up a server.]]></summary></entry><entry xml:lang="es"><title type="html">Webmin: Administrando un servidor desde el navegador</title><link href="https://www.danielmartingonzalez.com/es/webmin-administrando-un-servidor-desde-navegador/" rel="alternate" type="text/html" title="Webmin: Administrando un servidor desde el navegador" /><published>2022-04-14T00:00:00+02:00</published><updated>2022-04-14T00:00:00+02:00</updated><id>https://www.danielmartingonzalez.com/es/webmin-administrando-un-servidor-desde-navegador</id><content type="html" xml:base="https://www.danielmartingonzalez.com/es/webmin-administrando-un-servidor-desde-navegador/"><![CDATA[<p>No conozco mucho de sistemas <em>Unix</em>. Si bien puedo teclear algunos comandos y moverme por sus directorios, no es algo a lo que esté acostumbrado ni con lo que me guste lidiar. Pero reconozco, que una distribución <em>Linux</em> es la mejor opción para montar un servidor.</p>

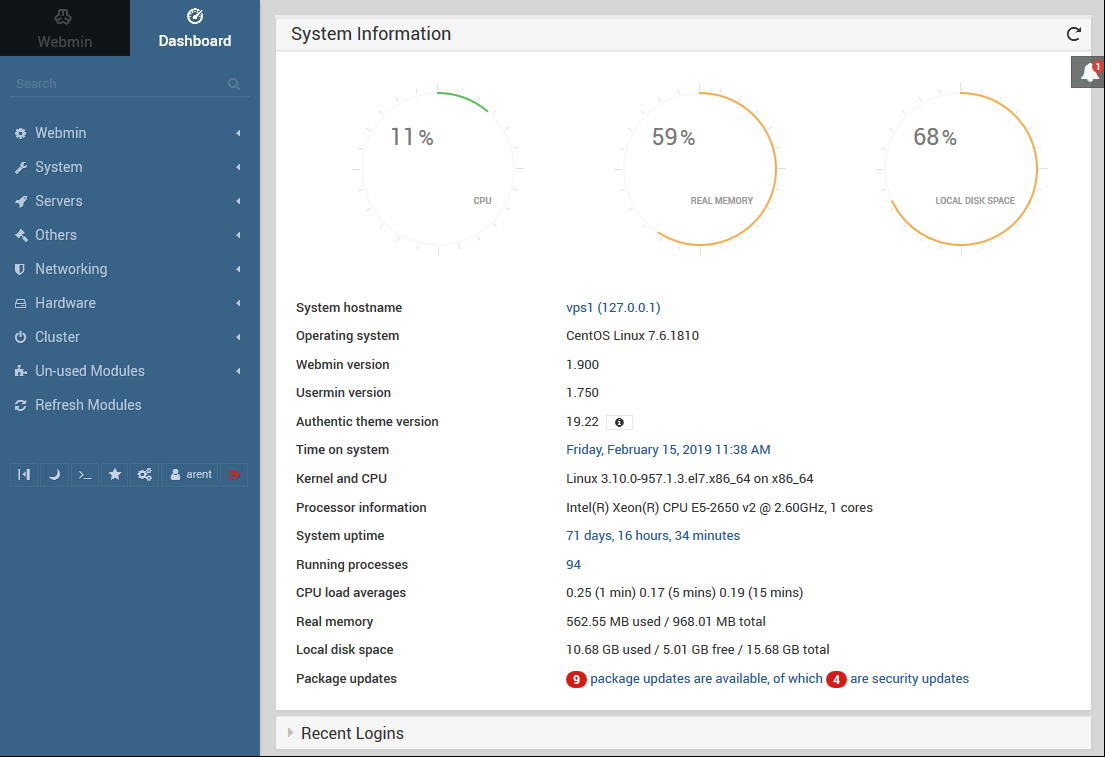
<p><a href="/assets/posts/es/webmin-administrando-un-servidor-desde-navegador/webmin-dashboard.png"><img src="/assets/posts/es/webmin-administrando-un-servidor-desde-navegador/webmin-dashboard.png" alt="Pantalla de inicio de información del sistema en Webmin (Dashboard)" /></a></p>

<p><a href="https://webmin.com/"><strong><em>Webmin</em></strong></a> resuelve la gestión de un servidor de manera elegante, ya que se trata de una herramienta de configuración de sistemas accesible vía web para sistemas <em>Unix</em>. Con ella, puedes desde la comodidad del navegador configurar cuentas de usuario, visualizar y editar archivos, ver el estado de los recursos del sistema y un largo etcétera. Este aplicativo nos ayuda a eliminar la necesidad de editar los archivos de configuración y de los servicios manualmente y brinda una interfaz para hacerlo de manera sencilla y con pequeños consejos.</p>

<blockquote>
  <p><strong>AVISO</strong>: <em>Webmin</em> permite modificar configuraciones y datos a nivel de núcleo del sistema, esto significa que antes de tocar cualquier módulo, conviene leer documentación acerca de cómo funciona y en que puede afectar a nuestro servidor.</p>
</blockquote>

<h2 id="instalación-y-uso">Instalación y Uso</h2>

<p>Vamos a instalar <em>Webmin</em> en el propio sistema por paquete <code class="language-plaintext highlighter-rouge">apt</code>. La razón de hacerlo así y no en un contenedor <em>Docker</em>, es porque <em>Webmin</em> necesita tener acceso completo a todo el sistema, tanto a archivos como a servicios. Además, si por cualquier motivo el servicio <em>Docker</em> cae, podremos seguir usando <em>Webmin</em> para solucionar el problema.</p>

<p>Suponiendo que nuestro servidor tiene una distribución basada en <em>Debian</em>, <em>Ubuntu</em> o <em>Mint</em>. Ejecutamos los siguientes comandos:</p>

<div class="language-bash highlighter-rouge"><div class="highlight"><pre class="highlight"><code><span class="nv">$ </span><span class="nb">sudo </span>wget <span class="nt">-qO</span> - http://www.webmin.com/jcameron-key.asc | <span class="nb">sudo </span>apt-key add -
<span class="nv">$ </span><span class="nb">sudo </span>sh <span class="nt">-c</span> <span class="s1">'echo "deb http://download.webmin.com/download/repository sarge contrib" &gt; /etc/apt/sources.list.d/webmin.list'</span>
<span class="nv">$ </span><span class="nb">sudo </span>apt <span class="nb">install </span>apt-transport-https <span class="nt">-y</span>
<span class="nv">$ </span><span class="nb">sudo </span>apt update
<span class="nv">$ </span><span class="nb">sudo </span>apt <span class="nb">install </span>webmin <span class="nt">-y</span>
</code></pre></div></div>

<blockquote>
  <p>Para el resto de distribuciones y tipos de instalación disponibles puedes consultar <a href="http://doxfer.webmin.com/Webmin/Installation">esta <em>Wiki</em></a>.</p>
</blockquote>

<p>Y poco más, por último, abrimos un navegador y accede a la dirección <code class="language-plaintext highlighter-rouge">https://&lt;ip_de_tu_server&gt;:10000</code>. En la pantalla principal (<em>Dashboard</em>) tendrás información resumida del estado de tu servidor. En la barra de la izquierda dispondrás de distintas utilidades para gestionar el servidor. Recuerda, antes de tocar, conviene leer la documentación de ese módulo y herramienta.</p>

<blockquote>
  <p>Es posible que, al entrar por primera vez, se muestre un error de certificados, acepta entrar de manera no segura.</p>
</blockquote>

<h2 id="referencias">Referencias</h2>

<ul>
  <li><a href="https://webmin.com">Webmin - Official Web</a></li>
  <li><a href="https://doxfer.webmin.com/Webmin">Webmin - Wiki</a></li>
  <li><a href="https://raiolanetworks.es/blog/webmin-usermin-virtualmin">Raiola Networks - Manual completo Webmin, Usermin y Virtualmin</a></li>
  <li><a href="https://linuxize.com/post/how-to-install-webmin-on-debian-10/">Linuxize - How to Install Webmin on Debian 10 Linux</a></li>
</ul>]]></content><author><name>Daniel Martín González</name></author><category term="Tutorial" /><category term="Server" /><category term="Webmin" /><category term="Server" /><category term="Tutorial" /><category term="Administración" /><summary type="html"><![CDATA[No conozco mucho de sistemas Unix. Si bien puedo teclear algunos comandos y moverme por sus directorios, no es algo a lo que esté acostumbrado ni con lo que me guste lidiar. Pero reconozco, que una distribución Linux es la mejor opción para montar un servidor.]]></summary></entry><entry xml:lang="en"><title type="html">Your files from Windows, installing a Samba Server on Debian</title><link href="https://www.danielmartingonzalez.com/en/samba-server-in-debian/" rel="alternate" type="text/html" title="Your files from Windows, installing a Samba Server on Debian" /><published>2022-01-07T00:00:00+01:00</published><updated>2022-01-07T00:00:00+01:00</updated><id>https://www.danielmartingonzalez.com/en/samba-server-in-debian</id><content type="html" xml:base="https://www.danielmartingonzalez.com/en/samba-server-in-debian/"><![CDATA[<p>Despite having different ways of <a href="https://www.danielmartingonzalez.com/en/online-file-browser-for-your-server/">accessing files on your server</a>, perhaps all of them become somewhat tedious if we are used to browsing through <em>Windows</em> folders. I have recently discovered a very simple way to have <a href="https://www.samba.org/"><strong>a <em>Samba</em> file server</strong></a> in <a href="https://www.debian.org/index.es.html"><em>Debian</em></a> and derivatives to be able to access the files on the server from a <em>Windows</em> client as if it were another folder.</p>

<p>Why do we need a <em>Samba</em> server to access files from <em>Windows</em> on a <em>Linux</em> server? Okay. By default, both systems use different file sharing protocols. <em>Samba</em> is a free implementation of the <em>Microsoft Windows File Sharing Protocol</em> (formerly called <em>SMB</em>, recently renamed <em>CIFS</em>) for <em>UNIX-like</em> systems.</p>

<h2 id="installation">Installation</h2>

<blockquote>
  <p>Most of the following commands require <code class="language-plaintext highlighter-rouge">root</code> privileges to run. You can use <code class="language-plaintext highlighter-rouge">sudo</code> or log in as <code class="language-plaintext highlighter-rouge">root</code> user and save yourself typing the prefix in each command.</p>
</blockquote>

<p>Install the <em>Samba server</em> package:</p>

<div class="language-shell highlighter-rouge"><div class="highlight"><pre class="highlight"><code><span class="nv">$ </span><span class="nb">sudo </span>apt update
<span class="nv">$ </span><span class="nb">sudo </span>apt <span class="nb">install </span>samba <span class="nt">-y</span>
</code></pre></div></div>

<p>Enable the <em>Samba</em> service to start with the system:</p>

<div class="language-shell highlighter-rouge"><div class="highlight"><pre class="highlight"><code><span class="nv">$ </span><span class="nb">sudo </span>systemctl <span class="nb">enable </span>smbd
</code></pre></div></div>

<p>If you use the system <em>firewall</em>, you need to open the following ports:</p>

<div class="language-shell highlighter-rouge"><div class="highlight"><pre class="highlight"><code><span class="nv">$ </span><span class="nb">sudo </span>ufw allow 139
<span class="nv">$ </span><span class="nb">sudo </span>ufw allow 445
</code></pre></div></div>

<p>Restart the <code class="language-plaintext highlighter-rouge">smbd</code> service and check that it’s running:</p>

<div class="language-shell highlighter-rouge"><div class="highlight"><pre class="highlight"><code><span class="nv">$ </span><span class="nb">sudo </span>systemctl restart smbd
<span class="nv">$ </span><span class="nb">sudo </span>systemctl status smbd

  ? smbd.service - Samba SMB Daemon
  ...
  Status: <span class="s2">"smbd: ready to serve connections..."</span>
  ...
</code></pre></div></div>

<h2 id="setting-up-samba-share">Setting up Samba Share</h2>

<p>Edit the <code class="language-plaintext highlighter-rouge">smb.conf</code> file with the command <code class="language-plaintext highlighter-rouge">sudo nano /etc/samba/smb.conf</code>, adding the following to the end of the document:</p>

<div class="language-config highlighter-rouge"><div class="highlight"><pre class="highlight"><code>[<span class="n">media</span>]
<span class="n">comment</span> = <span class="n">media</span> <span class="n">folder</span>
<span class="n">path</span> = /<span class="n">media</span>
<span class="n">writeable</span> = <span class="n">yes</span>
<span class="n">browsable</span> = <span class="n">yes</span>
<span class="n">public</span> = <span class="n">no</span>
<span class="n">valid</span> <span class="n">users</span> = <span class="n">danimart1991</span>, <span class="n">root</span>
</code></pre></div></div>

<p>I attach an explanation of each line:</p>

<ul>
  <li><code class="language-plaintext highlighter-rouge">[media]</code>: It is the short name that describes what we are going to share. An identifier.</li>
  <li><code class="language-plaintext highlighter-rouge">comment</code>: A comment to describe what we are sharing.</li>
  <li><code class="language-plaintext highlighter-rouge">path</code>: The path of the folder we want to share.</li>
  <li><code class="language-plaintext highlighter-rouge">writeable</code>: Indicates if we want the folder to be read-only or if you want to allow writes and deletions to be carried out on it.</li>
  <li><code class="language-plaintext highlighter-rouge">browsable</code>: If this share is seen in the list of available shares in a network view and in the navigation list.</li>
  <li><code class="language-plaintext highlighter-rouge">public</code>: Indicates if the folder does NOT need a password to access it.</li>
  <li><code class="language-plaintext highlighter-rouge">valid users</code>: List of users who will have access to the folder.</li>
</ul>

<blockquote>
  <p>You can see more options in the <a href="https://www.samba.org/samba/docs/current/man-html/smb.conf.5.html">documentation of the configuration file</a>.</p>
</blockquote>

<p>We save the file with the <code class="language-plaintext highlighter-rouge">F3</code> key and exit with <code class="language-plaintext highlighter-rouge">F2</code>.</p>

<h2 id="setting-up-users">Setting up Users</h2>

<p>As you can see, I have indicated in the <code class="language-plaintext highlighter-rouge">valid users</code> field which users can access the files. These users must have access to the shared folder and its files, otherwise they will not be able to see them when access it from <em>Windows</em>.</p>

<p>In addition, these users have to be created on our server. If not, just use the command:</p>

<div class="language-shell highlighter-rouge"><div class="highlight"><pre class="highlight"><code><span class="nv">$ </span><span class="nb">sudo </span>useradd danimart1991
</code></pre></div></div>

<p>Next. You have to declare that user in <em>Samba</em> and assign a unique password for this service. For this, use the following command:</p>

<div class="language-shell highlighter-rouge"><div class="highlight"><pre class="highlight"><code><span class="nv">$ </span><span class="nb">sudo </span>smbpasswd <span class="nt">-a</span> danimart1991
New SMB password: xxxxxxxx
Retype new SMB password: xxxxxxxx
</code></pre></div></div>

<p>Finally, restart the service:</p>

<div class="language-shell highlighter-rouge"><div class="highlight"><pre class="highlight"><code><span class="nv">$ </span><span class="nb">sudo </span>systemctl restart smbd
</code></pre></div></div>

<h2 id="conclusion">Conclusion</h2>

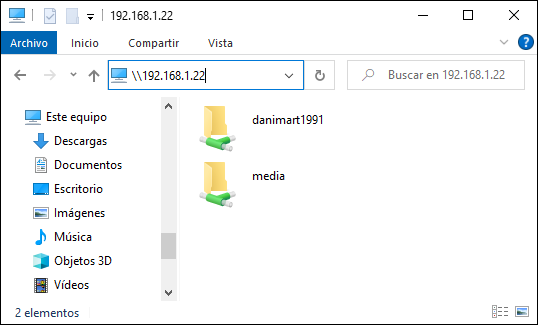
<p>We have already configured our <em>Samba</em> server for access from <em>Windows</em>. It is enough to open a <em>File Explorer</em>, write the server address and access indicating the credentials that have been previously created.</p>

<p><a href="/assets/posts/en/samba-server-in-debian/windows-samba.png"><img src="/assets/posts/en/samba-server-in-debian/windows-samba.png" alt="Server Access from Windows with Samba" /></a></p>

<p>Now you will have quick and easy access from your <em>Windows</em> devices to the server folders.</p>

<h2 id="references">References</h2>

<ul>
  <li>Thanks to José Antonio Simancas (<em>JASimancas</em>)</li>
  <li><a href="https://www.samba.org/">Samba</a></li>
  <li><a href="https://www.server-world.info/en/note?os=Debian_11&amp;p=samba&amp;f=1">Server World - Debian 11 Bullseye : Samba</a></li>
  <li><a href="https://www.linuxito.com/gnu-linux/nivel-basico/1233-instalar-y-configurar-un-servidor-samba-en-debian">Linuxito - Instalar y configurar un servidor Samba en Debian</a></li>
  <li><a href="https://unixcop.com/how-to-configure-samba-server-with-debian-11/">Unixcop - How to configure Samba Server with Debian 11</a></li>
  <li><a href="https://www.samba.org/samba/docs/current/man-html/smb.conf.5.html">smb.conf — The configuration file for the Samba suite</a></li>
</ul>]]></content><author><name>Daniel Martín González</name></author><category term="Tutorial" /><category term="Debian" /><category term="Server" /><category term="Debian" /><category term="Tutorial" /><category term="Samba" /><category term="SMB" /><category term="Windows" /><summary type="html"><![CDATA[Despite having different ways of accessing files on your server, perhaps all of them become somewhat tedious if we are used to browsing through Windows folders. I have recently discovered a very simple way to have a Samba file server in Debian and derivatives to be able to access the files on the server from a Windows client as if it were another folder.]]></summary></entry><entry xml:lang="es"><title type="html">Tus archivos desde Windows, instalando un Servidor Samba en Debian</title><link href="https://www.danielmartingonzalez.com/es/servidor-samba-en-debian/" rel="alternate" type="text/html" title="Tus archivos desde Windows, instalando un Servidor Samba en Debian" /><published>2022-01-07T00:00:00+01:00</published><updated>2022-01-07T00:00:00+01:00</updated><id>https://www.danielmartingonzalez.com/es/servidor-samba-en-debian</id><content type="html" xml:base="https://www.danielmartingonzalez.com/es/servidor-samba-en-debian/"><![CDATA[<p>Pese a tener diversas formas de <a href="https://www.danielmartingonzalez.com/es/explorador-de-archivos-online-para-tu-servidor/">acceder a los archivos del servidor</a>, quizás todas ellas se hacen algo tediosas si estamos acostumbrados a la navegación por carpetas de <em>Windows</em>. Hace poco he descubierto una manera muy sencilla de disponer <a href="https://www.samba.org/"><strong>un servidor de archivos <em>Samba</em></strong></a> en <a href="https://www.debian.org/index.es.html"><em>Debian</em></a> y derivados para poder acceder desde un cliente <em>Windows</em> como si fuera una carpeta más a los archivos del servidor.</p>

<p>¿Por qué necesitamos un servidor <em>Samba</em> para acceder desde <em>Windows</em> a los archivos en un servidor <em>Linux</em>? Bueno. Por defecto, ambos sistemas utilizan protocolos de archivos compartidos distintos. <em>Samba</em> es una implementación libre del protocolo de archivos compartidos de <em>Microsoft Windows</em> (antiguamente llamado <em>SMB</em>, renombrado recientemente a <em>CIFS</em>) para sistemas de tipo <em>UNIX</em>.</p>

<h2 id="instalación">Instalación</h2>

<blockquote>
  <p>La mayoría de los siguientes comandos necesitan privilegios <code class="language-plaintext highlighter-rouge">root</code> para su ejecución. Puedes usar <code class="language-plaintext highlighter-rouge">sudo</code> o iniciar sesión como usuario <code class="language-plaintext highlighter-rouge">root</code> y ahorrarte escribir el prefijo en cada comando.</p>
</blockquote>

<p>Instalamos el paquete <em>Samba server</em>:</p>

<div class="language-shell highlighter-rouge"><div class="highlight"><pre class="highlight"><code><span class="nv">$ </span><span class="nb">sudo </span>apt update
<span class="nv">$ </span><span class="nb">sudo </span>apt <span class="nb">install </span>samba <span class="nt">-y</span>
</code></pre></div></div>

<p>Habilitamos el servicio <em>Samba</em> para que inicie con el sistema:</p>

<div class="language-shell highlighter-rouge"><div class="highlight"><pre class="highlight"><code><span class="nv">$ </span><span class="nb">sudo </span>systemctl <span class="nb">enable </span>smbd
</code></pre></div></div>

<p>Si usamos el <em>firewall</em> del sistema, necesitamos abrir los siguientes puertos:</p>

<div class="language-shell highlighter-rouge"><div class="highlight"><pre class="highlight"><code><span class="nv">$ </span><span class="nb">sudo </span>ufw allow 139
<span class="nv">$ </span><span class="nb">sudo </span>ufw allow 445
</code></pre></div></div>

<p>Reiniciamos el servicio <code class="language-plaintext highlighter-rouge">smbd</code> y comprobamos que está ejecutándose:</p>

<div class="language-shell highlighter-rouge"><div class="highlight"><pre class="highlight"><code><span class="nv">$ </span><span class="nb">sudo </span>systemctl restart smbd
<span class="nv">$ </span><span class="nb">sudo </span>systemctl status smbd

  ? smbd.service - Samba SMB Daemon
  ...
  Status: <span class="s2">"smbd: ready to serve connections..."</span>
  ...
</code></pre></div></div>

<h2 id="configurando-samba-share">Configurando Samba Share</h2>

<p>Edita el archivo <code class="language-plaintext highlighter-rouge">smb.conf</code> con el comando <code class="language-plaintext highlighter-rouge">sudo nano /etc/samba/smb.conf</code>, añadiendo al final del documento lo siguiente:</p>

<div class="language-config highlighter-rouge"><div class="highlight"><pre class="highlight"><code>[<span class="n">media</span>]
<span class="n">comment</span> = <span class="n">media</span> <span class="n">folder</span>
<span class="n">path</span> = /<span class="n">media</span>
<span class="n">writeable</span> = <span class="n">yes</span>
<span class="n">browsable</span> = <span class="n">yes</span>
<span class="n">public</span> = <span class="n">no</span>
<span class="n">valid</span> <span class="n">users</span> = <span class="n">danimart1991</span>, <span class="n">root</span>
</code></pre></div></div>

<p>Adjunto una explicación de cada línea:</p>

<ul>
  <li><code class="language-plaintext highlighter-rouge">[media]</code>: Es el nombre corto que describe aquello que vamos a compartir. Un identificador.</li>
  <li><code class="language-plaintext highlighter-rouge">comment</code>: Un comentario para describir que estamos compartiendo.</li>
  <li><code class="language-plaintext highlighter-rouge">path</code>: La ruta de la carpeta que queremos compartir.</li>
  <li><code class="language-plaintext highlighter-rouge">writeable</code>: Indica si queremos que la carpeta sea de solo lectura o si quieres permitir que se realizan escrituras y borrados sobre ella.</li>
  <li><code class="language-plaintext highlighter-rouge">browsable</code>: Si este recurso compartido se ve en la lista de recursos compartidos disponibles en una vista de red y en la lista de navegación.</li>
  <li><code class="language-plaintext highlighter-rouge">public</code>: Indica si la carpeta NO necesita contraseña para acceder a ella.</li>
  <li><code class="language-plaintext highlighter-rouge">valid users</code>: Listado de usuarios que tendrán acceso a la carpeta.</li>
</ul>

<blockquote>
  <p>Puedes consultar más opciones en la <a href="https://www.samba.org/samba/docs/current/man-html/smb.conf.5.html">documentación del archivo de configuración</a>.</p>
</blockquote>

<p>Guardamos el archivo con la tecla <code class="language-plaintext highlighter-rouge">F3</code> y salimos con <code class="language-plaintext highlighter-rouge">F2</code>.</p>

<h2 id="configurando-usuarios">Configurando Usuarios</h2>

<p>Como has podido ver, he indicado en el campo <code class="language-plaintext highlighter-rouge">valid users</code> que usuarios pueden acceder a los archivos. Estos usuarios han de tener acceso a la carpeta compartida y sus archivos, de lo contrario no podrán verlos cuando accedamos desde <em>Windows</em>.</p>

<p>Además, estos usuarios tienen que estar creados en nuestro servidor. De no ser así, basta con usar el comando:</p>

<div class="language-shell highlighter-rouge"><div class="highlight"><pre class="highlight"><code><span class="nv">$ </span><span class="nb">sudo </span>useradd danimart1991
</code></pre></div></div>

<p>A continuación. Tenemos que declarar ese usuario en <em>Samba</em> y asignarle una contraseña exclusiva para este servicio. Para ello usamos el siguiente comando:</p>

<div class="language-shell highlighter-rouge"><div class="highlight"><pre class="highlight"><code><span class="nv">$ </span><span class="nb">sudo </span>smbpasswd <span class="nt">-a</span> danimart1991
New SMB password: xxxxxxxx
Retype new SMB password: xxxxxxxx
</code></pre></div></div>

<p>Finalmente reiniciamos el servicio:</p>

<div class="language-shell highlighter-rouge"><div class="highlight"><pre class="highlight"><code><span class="nv">$ </span><span class="nb">sudo </span>systemctl restart smbd
</code></pre></div></div>

<h2 id="conclusión">Conclusión</h2>

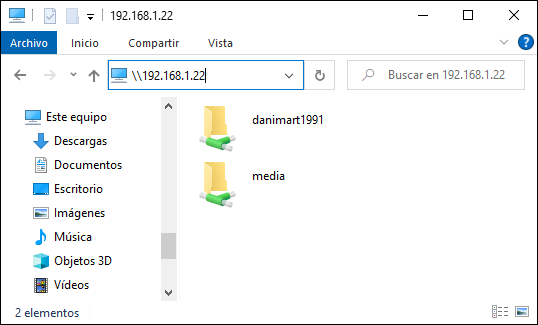
<p>Ya tenemos configurado nuestro servidor <em>Samba</em> para su acceso desde <em>Windows</em>. Basta con abrir un <em>Explorador de Archivos</em>, escribir la dirección del servidor y acceder indicando las credenciales que hemos creado previamente.</p>

<p><a href="/assets/posts/es/servidor-samba-en-debian/windows-samba.png"><img src="/assets/posts/es/servidor-samba-en-debian/windows-samba.png" alt="Acceso Servidor desde Windows con Samba" /></a></p>

<p>Ahora tendrás un acceso rápido y sencillo desde tus dispositivos <em>Windows</em> a las carpetas del servidor.</p>

<h2 id="referencias">Referencias</h2>

<ul>
  <li>Agradecimientos a José Antonio Simancas (<em>JASimancas</em>)</li>
  <li><a href="https://www.samba.org/">Samba</a></li>
  <li><a href="https://www.server-world.info/en/note?os=Debian_11&amp;p=samba&amp;f=1">Server World - Debian 11 Bullseye : Samba</a></li>
  <li><a href="https://www.linuxito.com/gnu-linux/nivel-basico/1233-instalar-y-configurar-un-servidor-samba-en-debian">Linuxito - Instalar y configurar un servidor Samba en Debian</a></li>
  <li><a href="https://unixcop.com/how-to-configure-samba-server-with-debian-11/">Unixcop - How to configure Samba Server with Debian 11</a></li>
  <li><a href="https://www.samba.org/samba/docs/current/man-html/smb.conf.5.html">smb.conf — The configuration file for the Samba suite</a></li>
</ul>]]></content><author><name>Daniel Martín González</name></author><category term="Tutorial" /><category term="Debian" /><category term="Servidor" /><category term="Debian" /><category term="Tutorial" /><category term="Samba" /><category term="SMB" /><category term="Windows" /><summary type="html"><![CDATA[Pese a tener diversas formas de acceder a los archivos del servidor, quizás todas ellas se hacen algo tediosas si estamos acostumbrados a la navegación por carpetas de Windows. Hace poco he descubierto una manera muy sencilla de disponer un servidor de archivos Samba en Debian y derivados para poder acceder desde un cliente Windows como si fuera una carpeta más a los archivos del servidor.]]></summary></entry></feed>