
Docker and Portainer in Debian
As our colleague Joaquín García explained in an extensive article in No Country for Geeks, Docker is a platform for running applications in containers. These containers are a virtualization method that includes everything imaginable to easily package an entire environment.
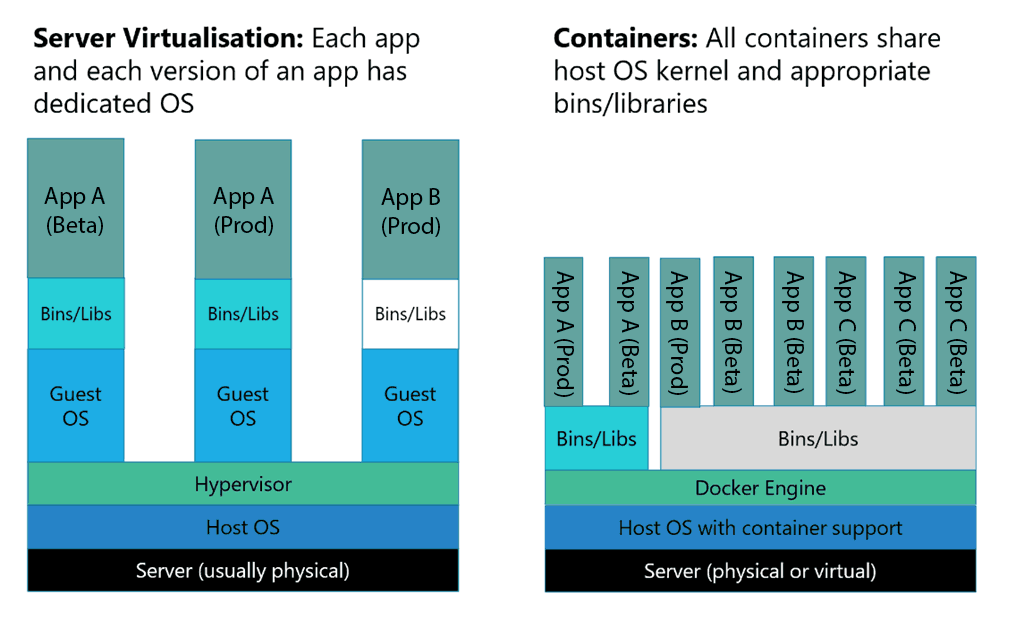
Given the flexibility with which different applications can be deployed on the same server and their independence from resources, and yet being able to communicate with each other, it becomes my preferred option to build piece by piece the whole ecosystem of my home server.
On the other hand Portainer “installed” as a container, gives us the power to mount containers on Docker and configure everything in a visual way. It even comes with templates with applications already prepared in containers to make its configuration even easier.
Prerequisites
Although in theory the following installation of Docker and Portainer can be done on any operating system based on Linux, we all know that depending on the distribution and version there are small differences. So, for the following steps in my case these prerequisites are fulfilled:
- Debian 12 64 Bit on a Mini-PC. Any other distribution based on Debian like Raspbian should also work.
sudocommand installed- Updated
sources.listfile withcontribandnon-freepackage collections - IP of the Mini-PC configured as static
- Repositories updated with the commands
sudo apt-get update,sudo apt-get upgradeandsudo apt-get dist-upgrade.
Installing packages and configuring the repository
We are missing a requirement, to add the repository in order to install Docker package.
-
Install the following packages to allow
aptto use secure repositories over HTTPS. Execute the following commands in the console, one by one:$ sudo apt-get update $ sudo apt-get install ca-certificates curl -
Add the official GPG keys for Docker.
$ sudo install -m 0755 -d /etc/apt/keyrings $ sudo curl -fsSL https://download.docker.com/linux/debian/gpg -o /etc/apt/keyrings/docker.asc $ sudo chmod a+r /etc/apt/keyrings/docker.asc -
Add the repository to the list of repositories to get Docker.
$ echo "deb [arch=$(dpkg --print-architecture) signed-by=/etc/apt/keyrings/docker.asc] https://download.docker.com/linux/debian \
  $(. /etc/os-release && echo "$VERSION_CODENAME") stable" | sudo tee /etc/apt/sources.list.d/docker.list > /dev/null
If you are using a Debian-derived distribution, the version may not be retrieved correctly. You will need to replace
(. /etc/os-release && echo "$VERSION_CODENAME")with the corresponding Debian version in your distribution, e.g.bookworm. -
Finally, update the package collection.
$ sudo apt-get update
Install Docker Engine
To install the latest stable version of Docker Engine just run:
$ sudo apt-get install docker-ce docker-ce-cli containerd.io docker-buildx-plugin docker-compose-plugin
After a few seconds you can check that Docker has been installed correctly by asking for the installed version and running the test hello-world image.
$ docker -v
Docker version 19.03.12, build 48a66213fe

$ sudo docker run hello-world
Unable to find image 'hello-world:latest' locally
latest: Pulling from library/hello-world
1b930d010525: Pull complete
Digest: sha256:4df8ca8a7e309c256d60d7971ea14c27672fc0d10c5f303856d7bc48f8cc17ff
Status: Downloaded newer image for hello-world:latest
Hello from Docker!
This message shows that your installation appears to be working correctly.
To generate this message, Docker took the following steps:
 1. The Docker client contacted the Docker daemon.
 2. The Docker daemon pulled the "hello-world" image from the Docker Hub.
    (amd64)
 3. The Docker daemon created a new container from that image which runs the
    executable that produces the output you are currently reading.
 4. The Docker daemon streamed that output to the Docker client, which sent it
    to your terminal.
To try something more ambitious, you can run an Ubuntu container with:
 $ docker run -it ubuntu bash
Share images, automate workflows, and more with a free Docker ID:
 https://hub.docker.com/
For more examples and ideas, visit:
 https://docs.docker.com/get-started/
To finish with the installation of Docker, it is recommended to add the regular user as Docker administrator by adding him to the docker group.
$ sudo adduser YOURUSER docker
Adding the user 'YOURUSER' to the docker group ...
Done.
Portainer
Now that Docker Engine is installed on the server, you can run images through containers. One of the easiest ways to manage these containers, their volumes, the images… is with Portainer.
Creating a volume
First, you are going to create a volume for the Portainer data. A volume is nothing more than a data persistence mechanism to store data used and generated by a Docker container. This way, even if you delete, update, or break the container, the application’s configuration data will still be safe so that you can redeploy a new container from the same image without further concern.
There is some discussion about whether it is better to use volumes or mount a host folder for data persistence. In most cases that you will handle, it is a matter of taste - try both!
$ docker volume create portainer_data
portainer_data
Although they can be viewed later from Portainer, you can look at the volume listing and inspect one to see among other things the directory where the files are located on the server using the commands:
$ docker volume ls
DRIVER      VOLUME NAME
local       portainer_data
$ docker volume inspect portainer_data
[
    {
        "CreatedAt": "2020-07-09T08:16:57+02:00",
        "Driver": "local",
        "Labels": {},
        "Mountpoint": "/var/lib/docker/volumes/portainer_data/_data",
        "Name": "portainer_data",
        "Options": {},
        "Scope": "local"
    }
]
Install Portainer
Leaving aside the ‘helloworld’ container, let’s mount your first container, this time based on the image of _Portainer. Execute the command:
$ docker run -d --name=portainer --hostname=portainer --network=host --restart=always -v /var/run/docker.sock:/var/run/docker.sock -v portainer_data:/data -e TZ='Europe/Madrid' portainer/portainer-ce

Unable to find image 'portainer/portainer-ce'
d1e017099d17: Pull complete
b8084bf83dcf: Pull complete
Digest: sha256:55c...
Status: Downloaded newer image for portainer/portainer-ce:latest
96f1...
As it is a quite long command, it is recommended to know the docker commands although it can be done visually from Portainer, I will explain each part:
docker run -d: Create a container with the following configuration if it does not exist and start it.--name=Portainer: The name of the container. This is important because you can have several containers based on the same image.--hostname=Portainer: The name of the container machine. Optional, but it is very useful to configure this parameter to see at a glance this name when we access by console and associate that this terminal is from this container. (Thanks to @Rapejim for the tip).--network=host: Thehostnetworking uses the IP address of the host running docker such that a container’s networking appears to be the server rather than separate.--restart=always: Restart the container if it stops. If it stops manually, it is only restarted when the container is manually restarted, or the Docker service is restarted.-v /var/run/docker.sock:/var/run/docker.sock: Links a server folder (left), with a container folder (right). In this case as Portainer will have access to the server containers, it links its information with thedocker.sockfile.-v portainer_data:/data: Links the volume, with the Portainer configuration folder inside the container.-e TZ='Europe/Madrid': Although it is not necessary, I usually like to manually set the time zone for the container.portainer/portainer-ce: Indicates the image used to mount the container. If no version is specified, it will take the latest stable version.
Using Portainer
Then, open a Web browser on any device that is connected to the same network as the server and access the address: http://SERVERIP:9000/.
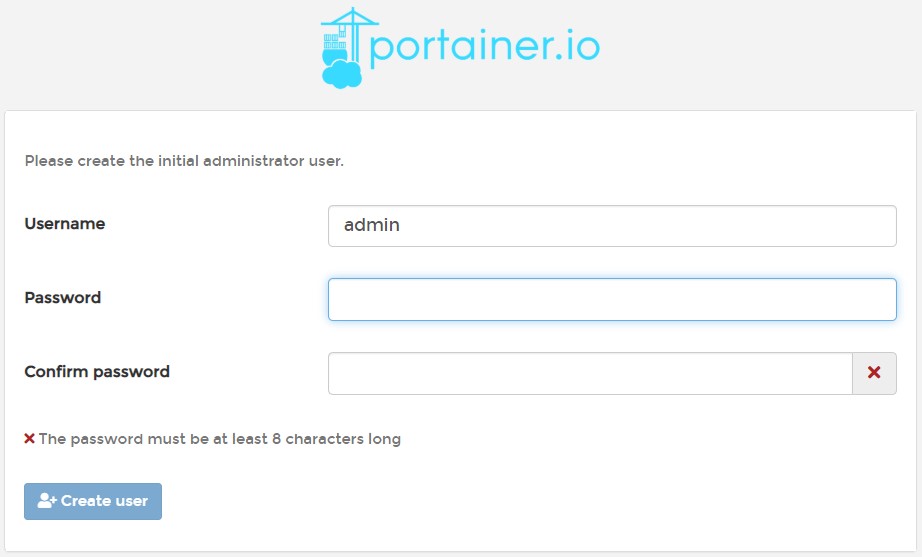
When accessing for the first time, the registration screen will open to enter the data of the Portainer administrator user.
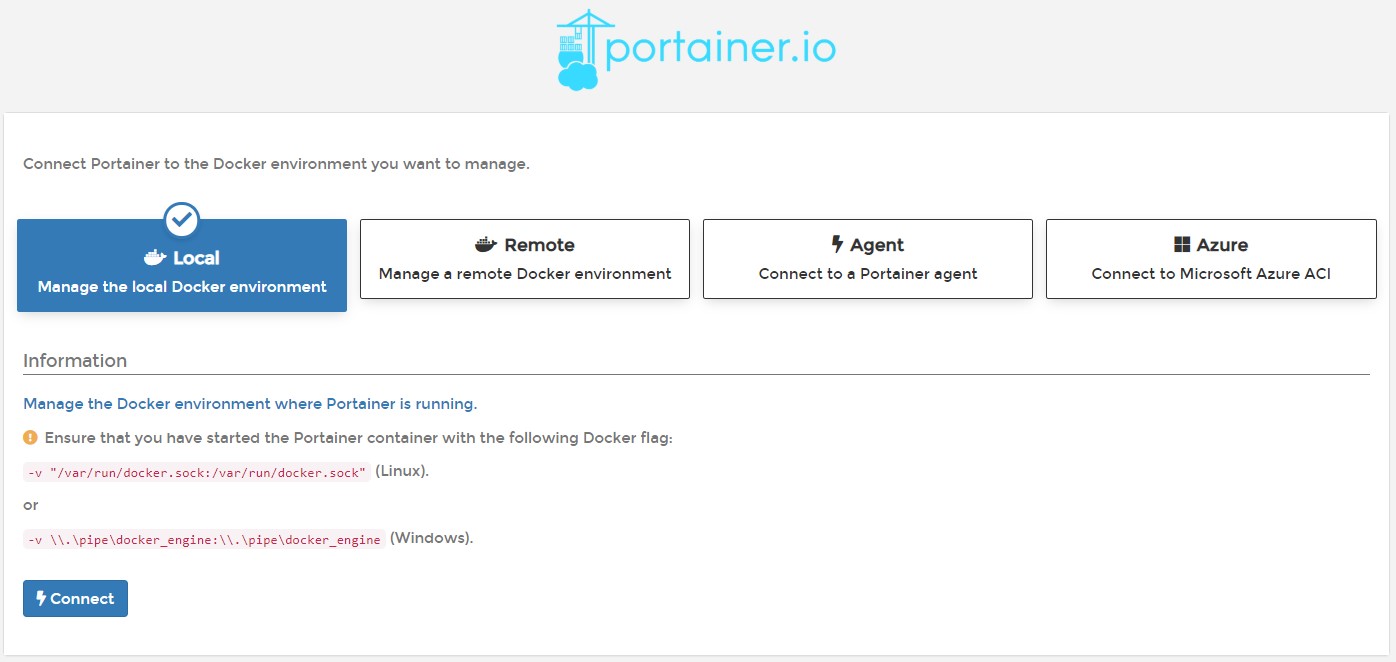
Then he will ask for the type of installation. Select Local.
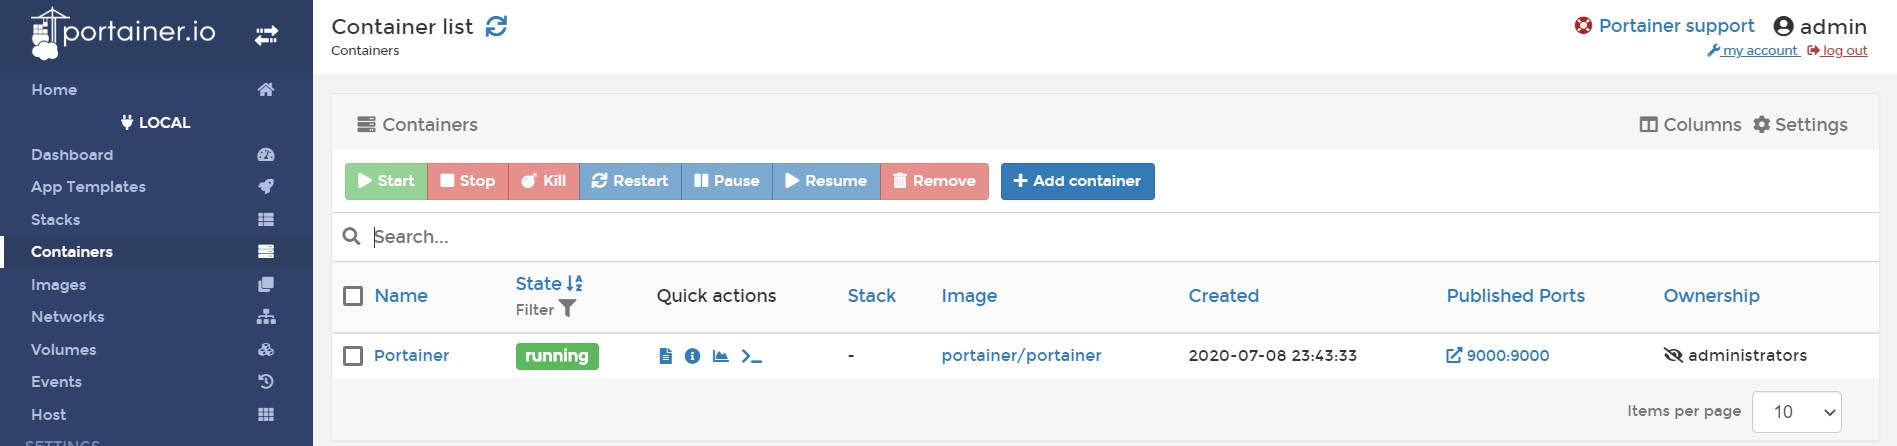
The next screen will be the Dashboard from which you can see the mounted containers, downloaded images, configured volumes… The next steps are to learn a little more about Docker, and start configuring containers and then see their status from Portainer.
Bonus: Portainer App Templates
One of the most powerful sections of Portainer is App Templates. From this tab you can easily create containers and stacks ready to deploy with a couple of options.
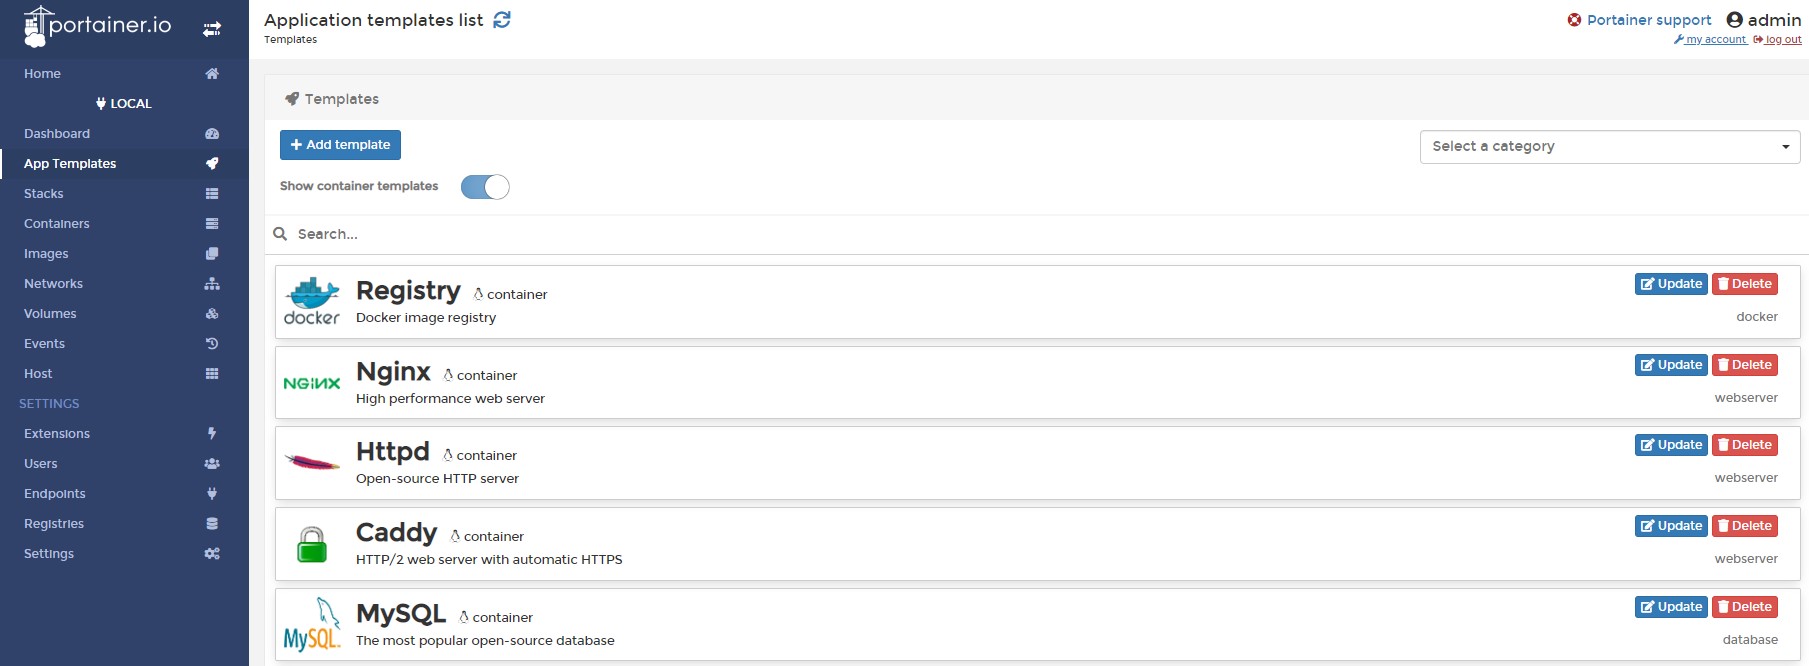
Simply select the application to be deployed, fill in the fields shown and click on Deploy. He will do the rest.
If you still can’t find templates for the applications, you can create your own from the Add template button. Or search the internet for a more complete list of templates and add them from Settings -> App Templates -> Use external templates.
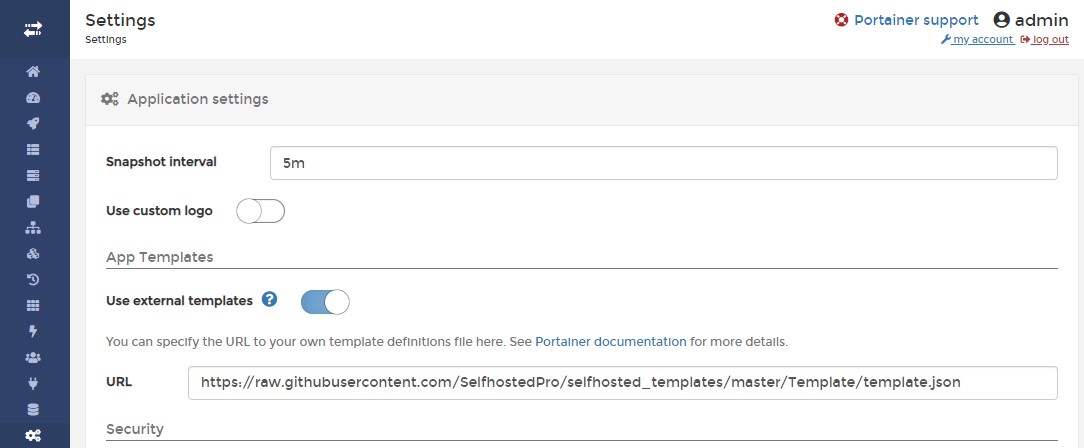
I recommend the list SelfHosted templates by ShelfHostedPro.
Bonus 2: Keep your containers up to date
With the container system, application files are usually static, that is, the folders and files saved inside the volume are usually the files that change, settings, data… but the rest of the container has files that do not change with use. That is why, although in some cases, if you update an application with the typical dialog, the application may be updated. The appropriate thing to do is to update the container with the new image that will contain the new version and save only the persistent data saved in the volume.
To do this, just enter the container from Portainer and click on Recreate. If the container is configured with a branch it will download the last image of that branch and reload the container from scratch, respecting the volume contents.

But how do you know if there are images with pending updates? Many times, you will not be interested in updating, but @SolarNeron shares with us a very good option to be notified of new versions. Most images are hosted and create images with new versions in GitHub repositories. You can use this feature to your advantage.
For example, this is the repository of the Portainer image.
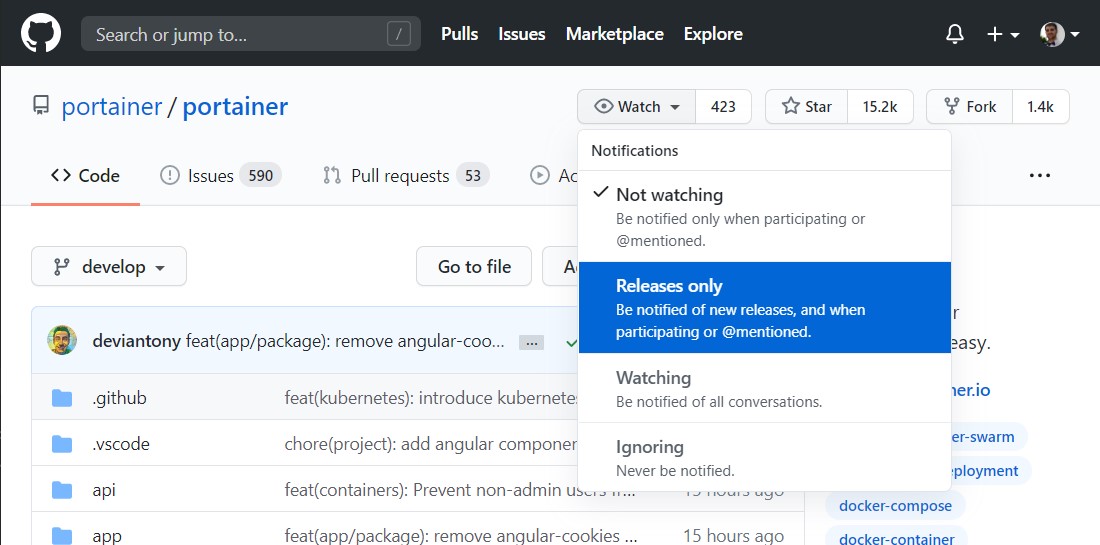
From GitHub, you will only need to click on Watch -> Releases only and you will receive a notification in GitHub and in your mail every time a new version is deployed. Again, you’ll just have to recreate the container to update the image and the application.
Conclusion
Using Docker you will be able to deploy and manage applications in your server in a simple but very powerful way, being able to control the persistent data and being able with Portainer to carry all this management in a visual way. Try to try some applications that you see interesting to learn how the container virtualization system can be one of the best alternatives for your server.