
Calibrate Sensors in ESPHome
Whether you have changed the firmware of a Wi-Fi device with an ESP8266/ESP32 type chip, or if you have created your own device with different sensors, you will have noticed that the measurements of some sensors are not very real. Many sensors do not require any extra configuration from us, they just work and give their value, but others may come with a slight deviation from factory.
A very typical case is Wi-Fi sockets with consumption meter or temperature and humidity sensors. With the original firmware they come calibrated to avoid sensor drift, but by changing your system to ESPHome we lose that calibration. Relax, with ESPHome it is very easy to adjust these sensors to give a more accurate result, but it takes time and patience. I am going to explain my method to calibrate using an example of a socket with a consumption meter.
Before starting
We are going to work directly on the device with ESPHome, therefore, it is not necessary Home Assistant or any other home automation management software, although it can help as we will see later.
What are we going to need?
- ESPHome (Dashboard) to edit the
.yamlfile with the source code, compile it and see the Logs it generates. - A device with ESPHome firmware and the sensor that we want to calibrate. The definition of the sensor in the
.yamlfile needs to be clean of modifiers to get the actual value that the sensor provides. - An analog or digital reference device.
- Different references.
Reference devices
This device will depend on the type of sensor to be calibrated.
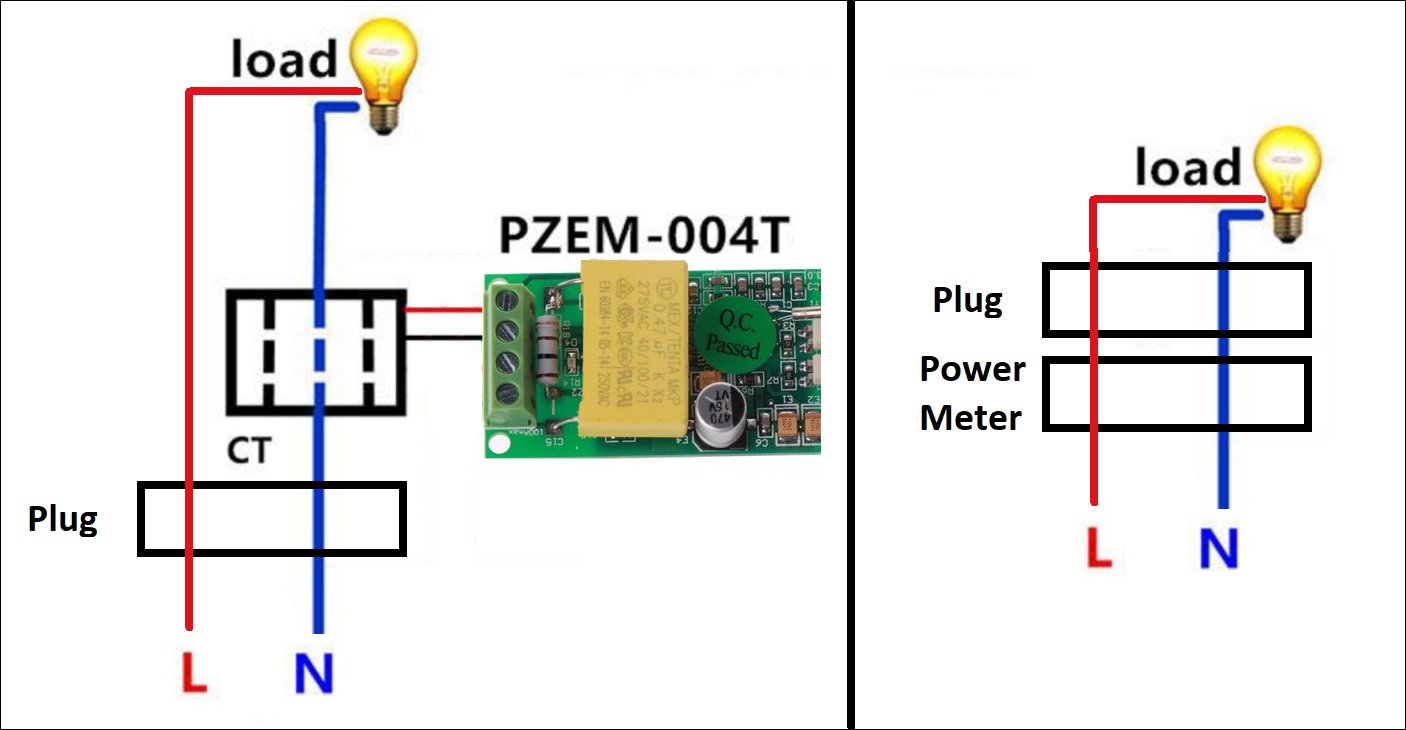
In the case of plugs, you can buy a consumption meter right here, or use any other plug already calibrated, or even a PZEM-004T with the clamp attached to measure the same consumption as the device we want to calibrate. Depending on the reference device, the mounting will be different.
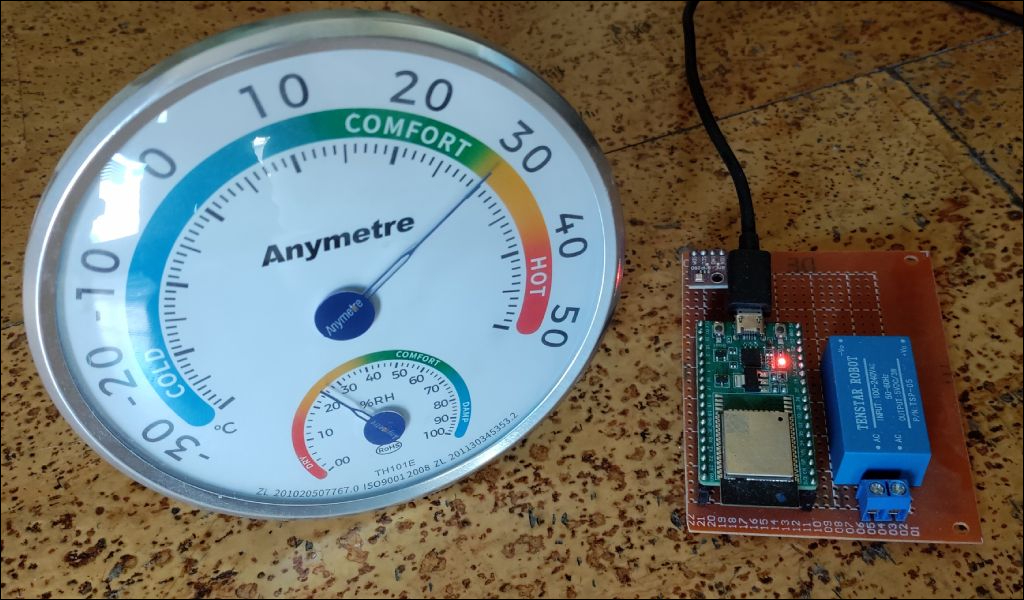
For other types of sensors such as temperature or humidity, an analog or even digital thermometer can serve as a reference.
Different references
As we will see below, the main thing is to obtain different measurements so that ESPHome itself adjusts the deviation as much as possible. The more references, the better definition.
For example, for plugs, different devices that generate different consumptions such as a hair dryer (which also has different positions), filament bulbs, a toaster… Always be careful not to exceed the maximum that the sensor can withstand.
For temperature sensor, you can use liquids or environments at different temperatures. For humidity, a humidifier…
In all these measurements, the reference device will be the one that tells us the real value.
Approach
As already mentioned, the idea behind getting the calibration is to obtain references from the sensor relative to an actual measurement in another sensor and calibrated. The more measurements we make, the more references and the more accurate it will be.
In addition, it is very important to carry out measurements in all possible ranges, that is, at least measurements at each possible end of the sensor measurement and in the middle of the range, with this we will make sure to cover all possible scenarios.
The way to perform these measurements can differ greatly depending on the device to be measured and the type of sensor. For example, if we opt for a plug, it usually includes three measurements: current, voltage and power, so we will need reference values of all of them.
If we have a consumption meter as a reference, it will be convenient to have the meter’s results display nearby and thus be able to compare with the measurements collected by the sensor that we want to calibrate. For example, we can use a webcam and thus, on the computer’s own screen, see both values at a glance and at the same time stamp. If, on the other hand, as is my case, we have a PZEM-004T with ESPHome, we can have the Logs of both devices in split screen and thus at a glance see both.
Getting references
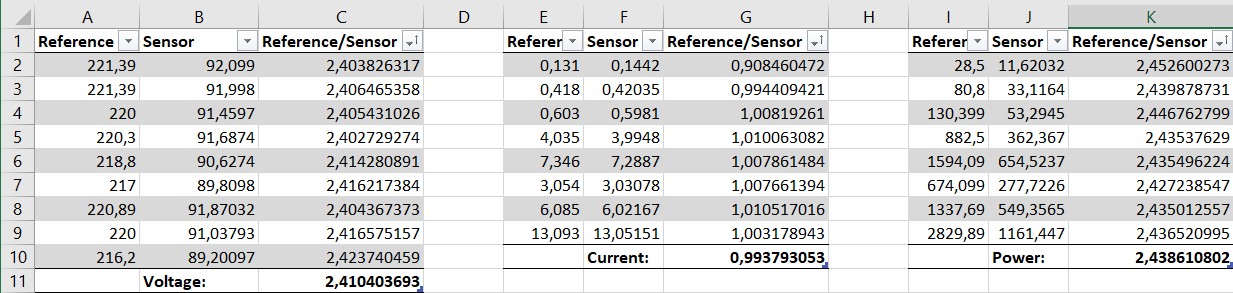
As we have suggested, the idea is to obtain different references and to write all of them for example in a spreadsheet like this.
Again we must remember that it is very important to obtain the extreme cases of the range that the sensor supports, as well as the null reference (in the case of a plug, when the consumption is 0A/0W). A sensor can generate values on itself or on the reference device, that is, the plug to be calibrated itself generates consumption as it is an electronic device, on the consumption meter plug that we are using as a real reference, and that difference is important to note.
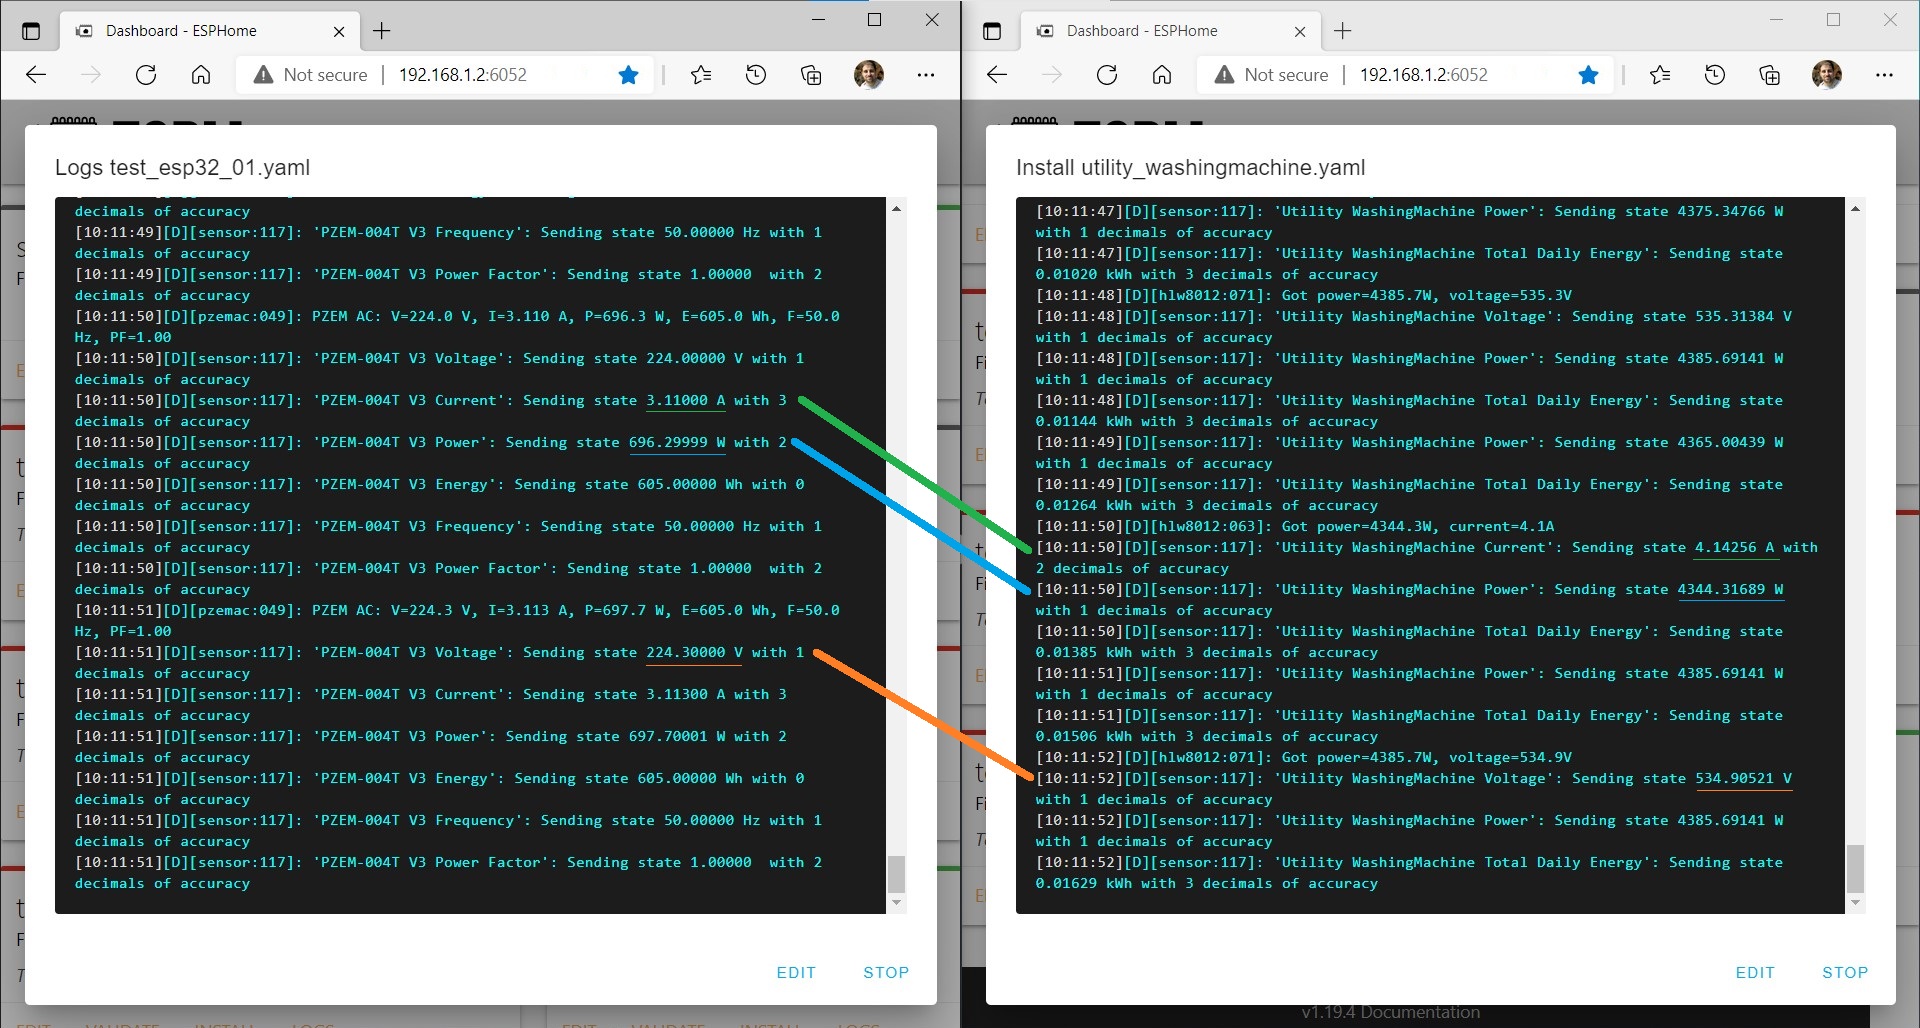
The process that I follow is to have both devices on the screen, force a reference (for example, turn on the hair dryer in a specific position and wait a few seconds for it to stabilize) and then take and save a screenshot where it is appreciate both sensors with their respective attributes. When I have several captures, I look for the correlation between the two (in the ESPHome Logs it is enough to look for the same type of matching attribute in the same timestamp in both Logs), and I write it down.
The Correlation
Then, with the spreadsheet itself, we can easily obtain a correlation between both values by dividing the real value by the deviated value.
In ESPHome there are several ways to indicate this deviation to the sensor or attribute:
-
If the correlated values differ a lot, or if we want a more precise measurement, we can use the
calibrate_linearfilter, indicating each of the references that we have made.current: id: ${device_name}_current name: ${friendly_name} Current icon: mdi:current-ac unit_of_measurement: A filters: - calibrate_linear: # Map 0.0 (from sensor) to 0.0 (true value) - 0.0 -> 0.0 - 0.131 -> 0.1442 - 0.418 -> 0.42035 - 0.603 -> 0.5981 - 3.054 -> 3.03078 - 4.035 -> 3.9948 - 6.085 -> 6.02167 - 7.346 -> 7.2887 - 13.093 -> 13.05151Note: Although in the spreadsheet I do not include the correlation with 0 to avoid a wrong mean (since in my case the reference is also 0). It is necessary to include it in the list.
-
If the correlated values are very close to each other, or if we do not care that the measurement has a small deviation, we can use other types of filters that modify the value obtained by the sensor by the mean of correlated values, for example,
multiply.current: id: ${device_name}_current name: ${friendly_name} Current icon: mdi:current-ac unit_of_measurement: A filters: - multiply: 0.993793
Note: Sometimes the correlation is not linear. For these cases, ESPHome has other filters with which to carry out other types of operations. For example, I have a temperature sensor that always marks two degrees lower, so I use the filter
offset: 2.0.
Checking the results
Finally, it only remains to perform the same technique that we have used to obtain references but this time to verify that both the reference device and the device that we have calibrated offer the same results, in the case of having both in Home Assistant or calibrating several devices at the same time (be careful with stacking one on top of the other as the plugs themselves generate consumption), you can easily see the differences between them.
Many of the sensors have small deviations that are difficult to fix, but if they are significantly high, it is a good idea to start the process again in case an erroneous measurement has been made.
Conclusion
In a few steps, but investing a few hours, we have calibrated the sensors of the devices with ESPHome. With this, it will be much easier to be able to carry out automations or control the consumption or temperature of our home.
Feel free to ask or contribute your experience by following this article in the comments.
This and other articles complement the documentation of the GitHub repository where all the configuration of my ESP8266/ESP32 devices with ESPHome is available.